now onto the pillow. a necessity for a comfy sleep. cut a rectangle of cotton and one of batting, make sure you add seam allowance on all the sides. fold in half and stitch together leaving a small opening to turn.
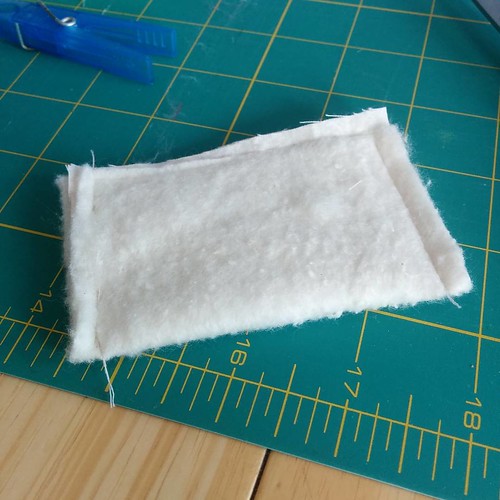
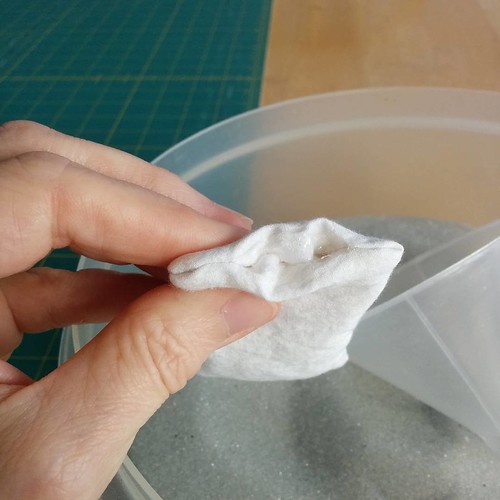
turn right side out and fill with “pellets”. i used glass sand blasting pellets just cause that’s what i have on hand. i bought a huge bag years ago, when i was still making bears and i still have tons left! but you can also use seed beads, play sand (clean please) or some miniature sites also say to use salt but you would have to be sure it would never get wet!
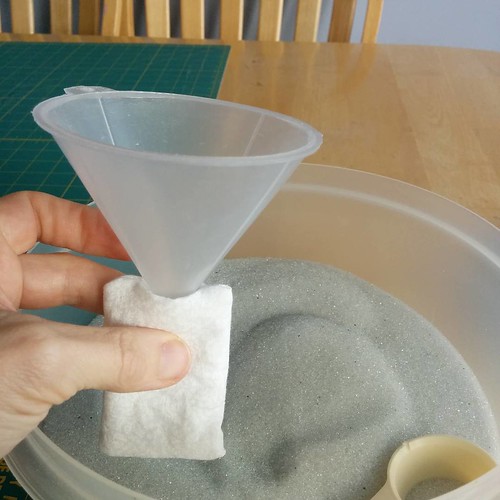
because my pellets are so fine and i don’t want any leakage at the seam i put a fine line of fabric glue on the inner seam. it is flexible and doesn’t show especially under the batting. after gluing it together i close the seam with a ladder stitch as usual.
now take a nap on your comfy new pillow.
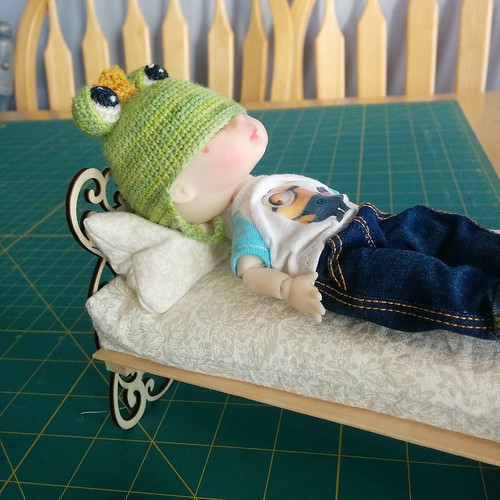
liya approves and demonstrates just how soft and squishy her new pillow is.
- 1:4 scale
- abandoned dock
- abjd
- abraham lake
- accessories
- adoption meme
- advent
- advent calender
- advent candles
- advent log
- advent wreath
- aerin
- afghan
- Agoseris glauca
- alberta
- albert einstein
- alice
- alys
- amberglas
- american girl
- amigurumi
- ananda
- ane
- annalise
- ant
- ante
- ante elf
- ante ws
- b&w
- baby spruce
- baby yoda
- bamboo jersey
- banff
- beargrass
- bear grass
- becca
- beezie
- berries
- bid
- big hill springs
- birch
- bird
- birds
- bjd
- bjd. diy
- black
- black and white
- blanket
- bleeding hearts
- blossoms
- board games
- bohemian
- bonnie
- books
- bory
- bottles
- bow glacier falls
- boys
- brown eyed susan. wildflower
- buffalo berries
- bunnies
- burgundy
- buttercup
- butterfly
- calgary zoo
- campfire
- camp fire
- canada post
- canada thistle
- cape
- carcross desert
- catkins
- cereza
- chair
- challenge
- charity
- chipmunk
- chloe
- christmas
- christmas hampers
- christmas lights
- christmas tree
- christmmas
- clematis
- clothes
- clouds
- cobweb weight
- cofee dye
- color
- colors
- columbine
- cone
- conservatory
- cooking pot
- cookstand
- costume
- cotton
- couch
- cowl
- cow parsnip
- crabapple blossoms
- crafts
- craft table
- creche
- cricket
- crochet
- crochet blanket
- crocheted
- cross stitch
- crowned crane
- crystal
- crystalorn
- c s lewis
- dandelion
- daylight
- deardoll
- dear doll
- decorating
- decorations
- design
- desk
- dhs elf
- diaoram
- digory
- dinosaur provincial park
- dioram
- diorama
- diy
- doll
- doll a day
- dollar store
- dollarstore
- doll blanket
- doll furniture
- dollhouse rug
- dollmore
- dolls
- doll sweater
- donations
- dovey
- dressup
- duck
- eat.sleep.knit
- eatsleepknit
- eilidh
- el
- elbow falls
- elbow lake
- elephant
- elf
- elf ante
- elf el
- elin
- ellemeno
- ellowyne
- ellyce
- ember
- embroidery
- emily/emmie
- emmie
- emrys
- enyo
- ery
- erzulie
- esk
- esk badge
- esk cal space shawl
- esk galaxy shawl cal
- eskkal
- esk space shawl cal
- etsy
- eve the cat
- face up
- faceup
- failryland
- fairylan
- fairyland
- fairyland pukifee
- fall
- fallen log
- fallen tree
- false dandelion
- fan art
- farmland
- felting
- ferns
- few flowered anemone
- fireplace
- fishing pole
- fishing rod
- flamingo
- foamflower
- fog
- food bank
- forget-me-nots
- forget me not
- fort mcmurray fire
- fossils
- fundraiser
- fungi
- fungus
- furniture
- gaillardia
- games
- garden
- giraffe
- giving
- glacier lily
- glacier national park
- glamour challenge
- gold
- golden ragwort
- gold metallic
- gray
- green
- greenhouse
- grizzly bear
- gypsy caravan
- gypsy caravanpsy caravan
- hail
- haines
- halloween
- hat
- headphones
- hoar frost
- hollyhock
- honeydelf
- honey delf
- honeythorpe
- hoodie
- hoody
- indian paintbrush
- iplehouse
- irrealdoll
- irreal doll
- irreal doll ery
- irreal dollo
- journal
- kaka
- katie
- kid delf
- kiri
- knit
- knitting
- lace
- lace knitting
- laceknitting
- lace skirt
- laceweight
- ladyslipper
- lae louise
- lake louise
- larkspur
- lati yellow
- leaf
- leaves
- letters to troops
- light
- lightbox
- linen
- littlefee
- littlefee el
- littlefee el ws
- lucy
- luka
- luna
- luts
- m-line
- madelintosh lace thunderstorm
- magpie
- makeover
- malabrigo mecha
- mas
- meadow parsnip
- meercat
- meg
- memories
- mica dam road
- minature props
- miniatre
- miniature
- miniature accessories
- miniature props
- miniatures
- mini chairs
- minifee
- mini garden
- mirwen
- mnf
- moeline
- mohair wig
- monkeyflower
- monster
- monument
- mountain heather
- mr tumnus
- msd
- msd. minifee
- mudstone
- mushrooms
- nandi
- narsha
- narsha friend
- never alone
- noah
- noni
- ocean
- old man's whiskers
- operation christmas child
- orange
- orchid
- oukifee
- pajamas
- pale yellow
- pattern
- peacock
- pearly everlasting
- penguin
- photo challenge
- photochallenge
- photography
- photo lights
- photo prop
- photoshop
- pi day
- pie day
- pink
- pio
- pipi
- pitta
- pkf
- poetry
- pom pom
- poppies
- prairie
- prairies
- prop
- props
- pukifee
- pukipuki
- pumpkin
- pupu
- purple
- pussy willows
- queen's cup
- quilt
- quilting
- quinn. bjd
- quote
- rain
- ravelry
- reafee
- realfee
- real puki
- realpuki
- red
- red panda
- red pandas
- reflection
- reflections
- remembrance day
- rockies
- rose
- rose hip
- rose hips
- roses
- rs
- ruby
- rug
- scenic
- sd
- seed
- seedhead
- sewing
- shabee
- shade garden
- shaelyn
- shawl
- sheep
- shiwoo
- shoebox gift
- shooting star
- shrubby cinquefoil
- silk hankies
- silk thread
- silky lupin
- silver
- skagway
- skylar
- sledding
- smidge
- smilga
- snow
- snowy owl
- sofa
- soom imda 3.0. collette. molly
- sophie
- sos
- soso
- souldoll
- soulkid
- soup pot
- space shawl
- sparrow
- spider web
- spring
- stitch markers
- stocking cap
- stockings
- stone
- stonecrop
- subalpine spiraea
- sunrise
- sunroom
- sun room
- sunset
- swap
- swaps
- table
- teddy
- temperature blanket
- temperature tracker
- texture
- thanksgiving
- the best laid plans.
- the great purge
- thistle
- thread crochet
- thread lace
- three flowered avens
- tiarella
- tiera
- tiger
- tin boxes
- tins
- tiny delf
- tinydelf
- tinys delf
- townsend's solitare
- toy
- travel
- tree
- treehouse
- trees
- trehouse
- tres
- tumnus
- tunic
- tutorial
- tutrial
- twinberries
- upcycle
- washboard
- water
- water drops
- waterfall
- waterton
- waterton national park
- wedge pond
- western anemone
- western spring beauty
- wheelchair
- white
- whitehorse pass
- white skin
- white wolf
- wig cap
- wigs
- wild bergamot
- wild flower
- wildflower
- wild flowers
- wildflowers
- wild heliotrope
- wild rose
- wild strawberry
- william blake
- willow
- winter
- winter fun
- winter photography
- wisp
- wooden spools
- woodland
- wood violet
- wool
- work in progress
- wren
- yarn
- yarnathon
- yellow
- yo-sd
- yukon
- zoe
- zoo
bed for a 15cm princess- pillow
bed for a 15cm princess- mattress
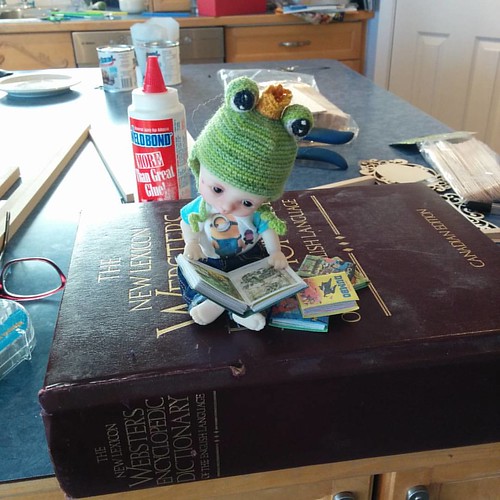
coming back to this one for a bit, while once again waiting for paint to dry on another project. (it is taking a very long time) this time i am working starting on the bedding. first the mattresses. to begin i cut out the filler. the rectangular bed got 1″ thick memory foam. that was too thick for the other two and hid too much of the head board so instead they got three layers each of warm and natural quilt batting.
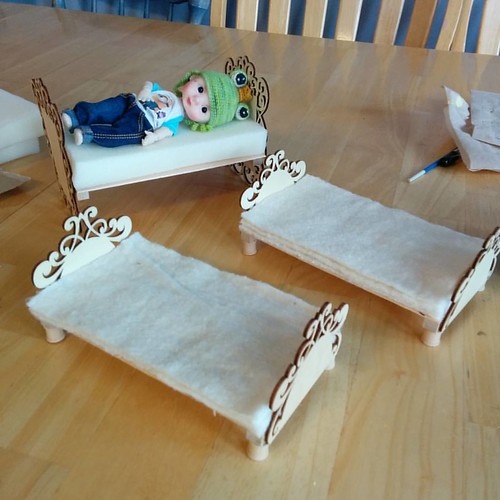
the covers are simple, pillow cover like. i cut a rectangle a little bigger than the filling, stitched it 1/4″ wider on each side for the smaller mattresses. 1/2″ bigger for the larger then “boxed” each corner, turned it right side out and stuffed. the small opening is closed with a ladder stitch. i had originally planned to make tufted and piped mattresses – even got one mostly done, but then realized that would mean i’d have to make bottom sheets for these tiny beds 🙁 so i tossed it and made these simple ones instead!

bed for a 15cm prince(ss) number 2 part 2
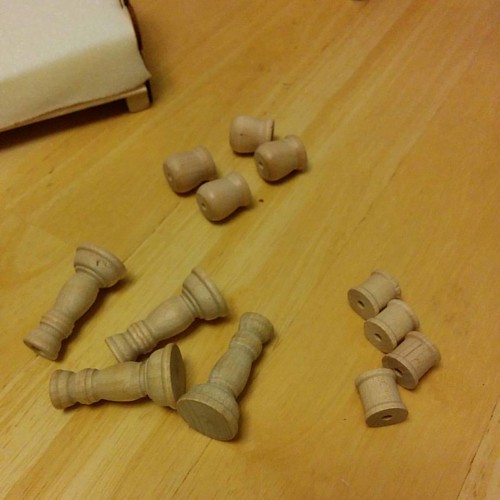
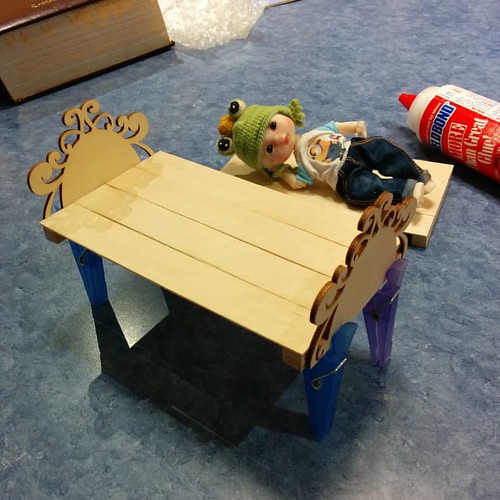
i dug through my supply box for possible legs and came up with these. they were the ones i had enough of that looked like they might fit. after trying each set out, the spools ended up being the best for both scale and size.
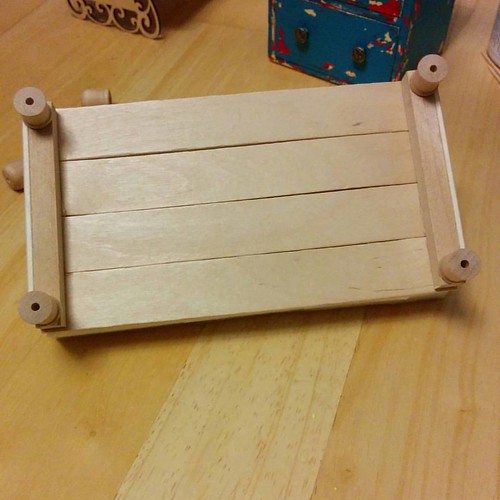
so i glued one to each corner
flip it over and the bed is ready to go. or at east ready for bedding…
Continue reading bed for a 15cm prince(ss) number 2 part 2 »
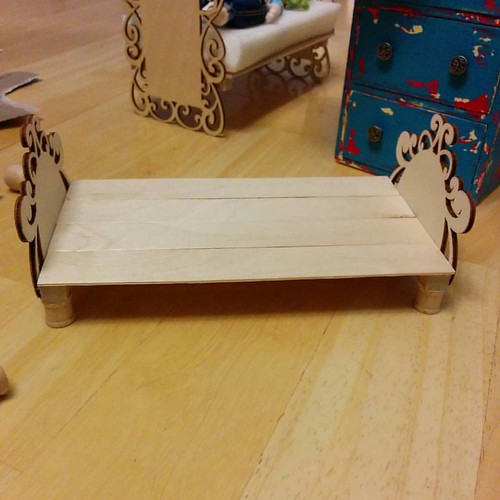
bed for a 15cm prince(ss) number 2
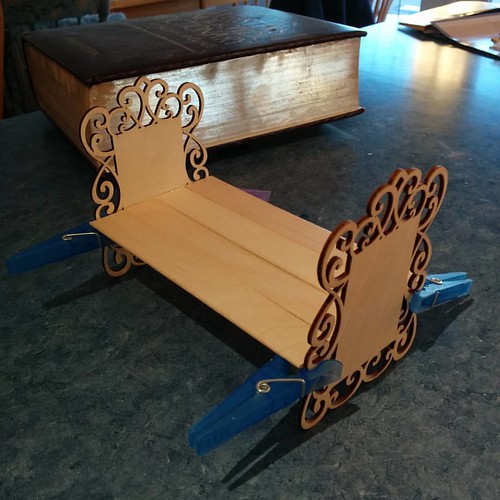
using the oval ornament from the previous post, i chose this time to cut it in half since it wouldn’t stand alone. i made the base the same way as the first bed, except i cut the dowels the full width of the 4 craft sticks.
glue the head and foot boards to the base lining up the bottom edges and clamp till dry. the clothespins would make funky legs but they are just temporary 😉
bed for a 15 cm prince(ss) part 2
once the glue has set, line up the base with one set of curls to make sure it is straight and glue it on. clamp in place till glue dries. proper clamps would be ideal but clothes pins work in a pinch ;0)
you can leave the bed like that or paint it as desired.
verdict:
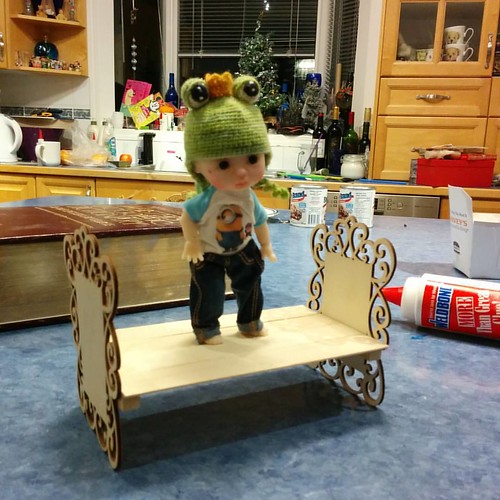
not very springy, it needs a mattress!
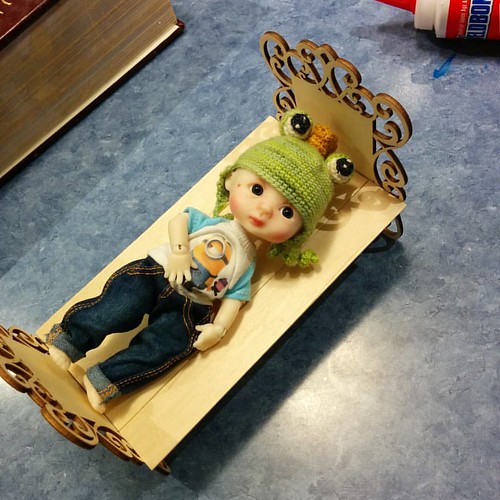
but it’s just the right size. 🙂
bed for a 15 cm prince(ss)
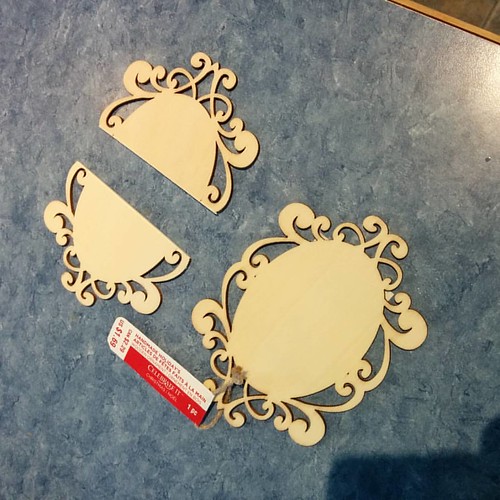
while we were waiting for paint to dry on the previous project, liya started hauling out wood and asking me to build her a princess bed that was just her size. feeling bad that every one thinks the poor girl is a boy since she is still bald i complied since it would be a fairly quick build anyway.
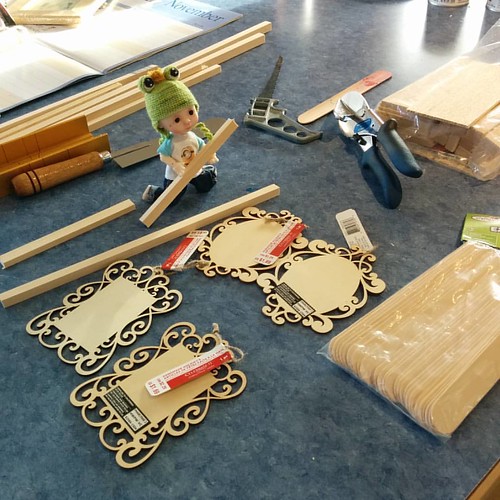
we gathered up a bunch of odds and ends to see what would work. the “frilly” ones are christmas ornaments i got on sale at michaels. we have jumbo craft sticks, odds and ends of square dowels left over from other projects, a bag of balsa scraps, my miter box, saws, pencil and glue. after some testing we decided to start with the rectangular ornaments for the head/footboard, the dowels for supports and 4 craft sticks for slats as the balsa wood was just a smidge too short and narrow.
next we figured out how high the bed should be and marked the dowel supports against the end boards at that point
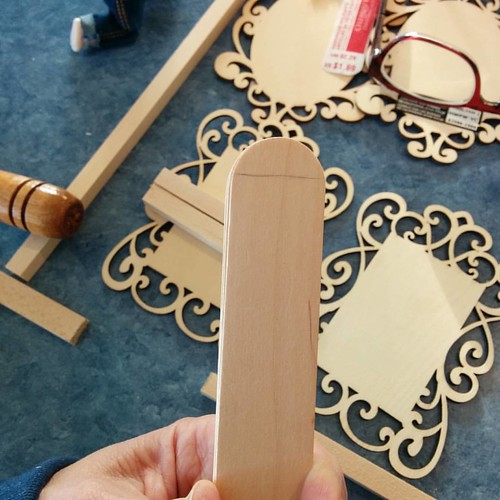
and marked the ends of the craft sticks so they would be square not curved

i wrapped some scotch tape around the craft sticks so that i could cut them all at once. then laid the bundle flat in my miter box and zipped off the ends. it is turned this way just to show how even it came out. (the miter box is really handy for people like me who don’t really know how to do wood work, and if you use your 40% off coupon at michaels it is less than $10… even in canada!. go on a separate day and use the coupon to get the matching saw that cheap as well ;))
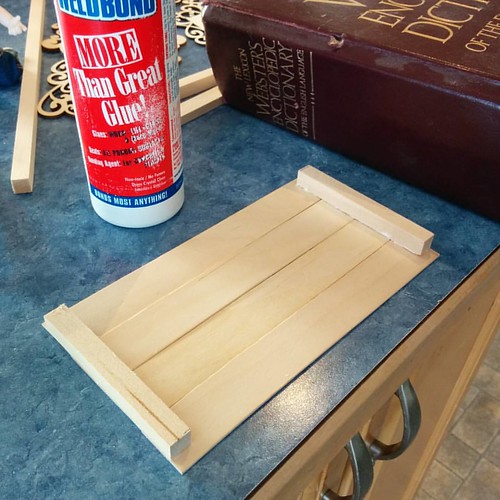
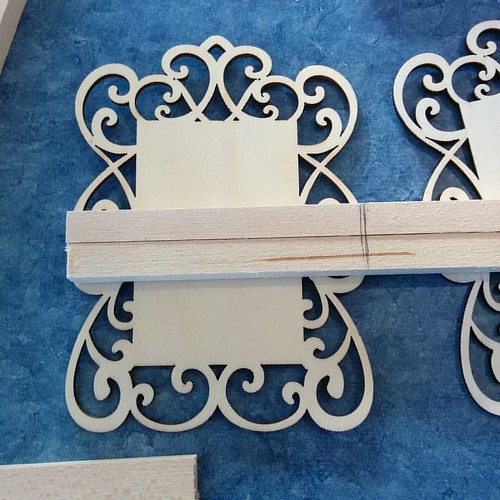
center the trimmed supports across the very ends of the slats making sure everything is square and even, and glue down using weld bond, or wood glue.
and placed a heavy weight on top and wait for the glue to dry