You are currently browsing the craft room cleanup category
Displaying 1 - 10 of 40 entries.

temperature blanket day 3

  • Posted on January 3, 2019 at 1:14 pm

after much dithering and changing my mind on how to do this, i realized that by only recording the high temps, i would have very few squares with my favorite colors- all those represented by the bottom colors, plus we often have wide temperature changes here, and i wanted to somehow show how great the change was in a single day. so i am doing the middle three rows as the high, then a 4th row as the low for the day, surrounded by a sc row of black. the squares with be joined with more black
by crocheting in the ends as i go. that way i should have at most one black end per day to weave in.

here is my final (i think) set of colors and the temperatures they represent. i expanded the range so i could use up more odds and ends of yarn instead of new balls.
28+ tart (prairie)
26-27 ravelry red (malabrigo lace)
22-25 fuscia (malabrigo lace)
18-21 neon pink (prairie)
15-17 cactus flower (malabrigo lace)
12-14 sunset (malabrigo lace)
9-11 sauterne (malabrigo lace)
6-8 butter (malabrigo lace)
3-5 applegreen (malabrigo lace)
0-2 water green (malabrigo lace)
-1 to -2 verde adriana (malabrigo lace)
-3 to -4 sapphire green (malabrigo lace)
-5 to -8 button jar blue (prairie)
-9 to -12 nassau blue (prairie)
-13 to -16 cian (malabrigo lace)
-17 to -19 azul bolita (malabrigo lace)
-20 to -22 jewel blue (malabrigo lace)
-23 to -26 wino forever (prairie)
-27 to -30 jacinto (malabrigo lace)
-31 to -35 periwinkle (malabrigo lace)
-36 and below natural (malabrigo lace)

yarn usages
2 daily highs to 1 gram
3 daily lows to 1 gram.
5 black edgings to 1 gram

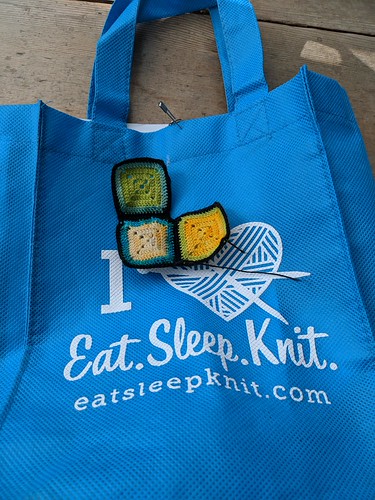
here is the first three days, sitting on top of my carry bag. this is my absolute favorite project bag, it is the perfect size and was a prize from a previous eatsleepknit yarnathon.
temperature blanket day 3

fishing pole!

  • Posted on December 27, 2018 at 8:36 am

my realpuki gypsies asked for a fishing pole, so they could catch themselves some dinner, so i went looking for supplies.
fishing pole parts
a skewer and some old watch parts, and tiny gold beads seemed like a good start. in addition i got a ruler to check the length, my e6000 glue since i would be gluing metal, a toothpick to apply the glue, and scissors to cut the rod.
the first thing i realized was that my skewers were to thick to be in scale. my ‘pukis wanted a nice light rod, not a heavy stick! toothpicks would have been the right width, but were’t long enough so i went out to the garage to get sandpaper and carefully sanded down the skewer till it was the right diameter. i kept rolling it while i sanded to keep it round.
fishing pole sanded
the rod on the right is the original diameter, the rod on the left is how i sanded it down.
next i applied a thin layer of dark brown to the top, and light brown on the bottom for a handle. when it dried it looked to dark/dull, so i over-painted with red on top, blue on the handle. i forgot to photograph this step, but you can see the colors in the later pictures anyway.

fishing pole reel
while the paint was drying i made the reel. i picked out two gears for the sides, and a small tube-like gear for the center spacer. i glued those all together and added a tiny bead for the handle.
fishing pole reel side
and a side view.

fishing pole loop guides
next i went to my craft supplies and got some very fine wire. i would have preferred brass/copper to coordinate with the reel, but all i had was silver tone, and since i am on a craft purge, whenever possible i am using what i have instead of buying new.
i wrapped the wire a couple of times around the rod, twisted it around a toothpick to form a loop, then wrapped it twice more around the rod, and cut off. i did this 4 times to get four loop guides. when i had them all done, i spaced them evenly along the rod, and added a touch of glue to keep them in position. then glued the reel on near the handle and let the glue set. from a small scrap of the wire, i made a fishhook shape.

fishihg pole reel finished
once the glue was set i tied a piece of invisible thread to the hook with a surgeons knot. a dab of glue made sure it wouldn’t come undone. the thread was then threaded through the loops and wrapped several times round the reel. another dab of glue kept it from un-winding. i left the ends intact till the glue set, then trimmed them as close as possible. you have to look really close to see the thread, since it is, more or less….invisible. but the scale looks perfect in real life.
tumnus approves his new rod
tumnus agrees!
tumnus approves his new rod

plant stand 3

  • Posted on December 23, 2018 at 1:00 am

i have a mini candlestick for the third one. it’s about 3 inches tall. i planned to do the top as a 1-1/4″ wood disk with a tile mandala, so it would coordinate with the first two.
plant stand 3

plant stand 3
it looked good that way, and i may come back and make another like this, but…

then i found this charm in my stash and decided it would look better with the furniture, and be more unique.
plant stand 3
i glued it on with e6000 glue, it’s my favorite for glueing metal to things.
plant stand 3
top view,
plant stand 3
side view, it’s coming together now.

after the glue set,a much longer wait with this glue than with my trusty white glues, i sprayed the metal with white paint. the paint i have is a paint and primer all in one and the same one i use as a base coat when i paint on plastics. normal acrylics just peel off without the primer. i sprayed it lightly as i wanted some of the dark metal color to show through.
plant stand 3
the wood was painted with more normal acrylic paint. since i was painting it white as well i didn’t have to worry about overspray. if i had wanted to do the bottom a different color i would have had to either do an even coat of the spray on the whole thing as a solid base coat or else paint the top separately before gluing it on.
plant stand 3

plant stand two

  • Posted on December 22, 2018 at 7:31 am

this is a repeat of the plant stand that i made for the little sunroom. the only difference is which mandala i “tiled” it with
i started with a tall tall skinny spool and a wood disk ( both from michaels) the spool is 2-3/4″ (7cm) tall x 1-1/8″ (28mm) wide. the disk is 1-1/2″ (35mm) in diameter
plant stand 2
glued on the top
plant stand 2
painted it white and picked another mandala for the “tiled” top
plant stand 2
plant stand 2
it’s funny how long i took to decide which mandalas to use on these first two. i wanted to be sure they looked good together and with the floor tile, even though chances are most of the mandala’s will be covered with the plant pots when the scene is done. at least i will know that they look good under the pot 😉

plant stand #1

  • Posted on December 21, 2018 at 2:38 pm

a conservatory needs lots of plant stands so that all the plants aren’t just sitting on the floor. i don’t have much time this close to christmas, but these are pretty quick so i figure i can get one done every day or so. once i get them all done, i’ll see how they fit in the greenhouse and decide which ones to use for this project and which will go in the box for future use.

the first one is just a simple wooden spool for the base and a disk for the top.
a greenhouse needs a lot of plant stands.  here is the first
to give you an idea of size, the disk is 1-1/2″ in diameter

just like the plant stand in my mini sitting room, i glued the disk on with wood glue, being careful to center it, and then let the glue dry
a greenhouse needs a lot of plant stands.  here is the first
and the side view
a greenhouse needs a lot of plant stands.  here is the first

once the glue dried i painted it with the translucent white paint. i still can’t get the paint to show up in the photos, so didn’t bother posting a picture of that step.

i picked another mandala “tile” from the pile of remaining mandalas – you can fit a LOT of 1 to 1-1/4″ circles on a single piece of card stock, so i had plenty to choose from! – then modgepodged it on top and brushed with a thin coat to seal. quick as that the first one is done.
a greenhouse needs a lot of plant stands.  here is the first

a greenhouse needs a lot of plant stands.  here is the first

starting greenhouse #2

  • Posted on December 19, 2018 at 3:35 pm

it’s time to get to work on the second greenhouse. this one i believe was from homesense. it’s a little bit bigger, so i can do a bit more with it.
greenhouse

once again i picked a tile from my collection, printed it on cardstock and sealed it before cutting.
greenhouse tiled
i’m going for a more outdoorsy look this time. more like a greenhouse, rather than just a sunroom.

for furniture i am using the other two pieces from my garden set.
greenhouse furniture
this will allow two or three ‘puki’s to enjoy the room.

greenhouse tea set
and apparently the puki’s think that is enough work for today, because they got the tea set out already! i don’t see them around so i expect they may have gone to get some cake…

making a simple plant stand

  • Posted on December 18, 2018 at 8:02 am

of course a conservatory wouldn’t be right with out at least a plant or two on plantstands. i didn’t have a lot of room in this one so decided to go fro just one.

i started with a tall tall skinny spool and a wood disk ( both from michaels) the spool is 2-3/4″ (7cm) tall x 1-1/8″ (28mm) wide. the disk is 1-1/2″ (35mm) in diameter
making a simple planter

first i glued the disk to the top of the spool, making sure it was centered.
making a simple planter

after the glue dried, i painted with translucent white paint (it doesn’t photograph that way but in real life this is whitish not just plain wood) you could get the same effect by thinning white acrylic paint with water, but i happened to have some that was pre-thinned so used that. next i did up a page of mandalas sized to fit. since i didn’t want to waste paper by only printing one circle and plan to make more planters for my second greenhouse later, i filled the page with a whole bunch of different ones. this time i printed it on plain printer paper, rather than card stock, because i wanted it to sit flush. i cut out and auditioned the various mandalas to see which i liked best. they always print in different tones than i get on my monitor, so i’m never sure which one(s) i will actually like till i try them. i chose this one because the tones work well with my floor tile. once i decided, the other circles got put away for later use and i used modge-podge to both attach and seal this one on top.
making a simple planter
the problem with zooming in, is that you see a lot of the imperfections that just aren’t noticeable when you look at them. case in point the pixelation on the tile is very hard to see in real life, and just makes for a soft, slightly worn look, perfect for the soft white stain on the wood.

a crocheted plant i made several years ago sits atop the new plant stand and the room is done. it’s too tiny to hold anything more.
finished room

while i was getting my camera, tuppence grabbed a couple of books, made herself a cup of hot tea, and claimed the room as her own.
tuppence settles in
her only complaint was that this close to christmas she thought the plant really ought to be a poinsettia or a christmas rose. i promised to look for one or make one for next year.

in spite of that i think she looks rather pleased with herself don’t you?

conservatory furniture

  • Posted on December 17, 2018 at 7:24 am

furniture was easy, just took some time it involved rooting around in some boxes upstairs and auditioning garden furniture i had collected over the years to see what fit. in the end i decided to use this rocker and small table. the matching lounge and coffee table should fit in my second sun room.
furniture

a tiny sun room

  • Posted on December 16, 2018 at 5:19 pm

in the closet of my craft room were a couple of glass lanterns/terrariums that i thought would make nice sun rooms for my ‘pukis.

this is one i picked up at michaels a year or so ago, and then like many other things, stuffed it in my craft room and never did anything else with it. i’m starting with this one because it is smaller and should be a quick project.
mini greenhouse

i wanted a tiled floor, and didn’t want to spend a lot of time on it, since most of it will be covered with furniture,anyway, so i trimmed and added paper, test the fit, trimmed and added more till i got a perfectly fitting pattern for the inside floor. i marked the front. then printed off tile from my saved file on the computer. the pattern was traced on the back, carefully cut out, then just a quick couple of coats of sealer later, i had this
mini greenhouse tile

voila, a tiled floor
mg floor tiled

attaching the door

  • Posted on December 11, 2018 at 8:10 am

this probably doesn’t deserve a separate post, since the door is just glued together then glued on the caravan, but my time has been a bit tight lately and it took two days to get it done!

after the paint dried, i glued the details to the door first. it turned out the window frame was slightly too small to match up so i didn’t use it, but there is enough detail on the door that it didn’t matter.
door glued

then glued the door to the caravan.
door attached

i was being lazy and didn’t want to take all the bedding and stuff out of the caravan again so that i could turn it on it’s side, so i ended up having to sit there and hold it in place while the glue set, only a couple of minutes so not too bad. luckily i also like to read, so it wasn’t a problem just sitting there.
the size is perfect. i kind of wish now that i had made the top wood paneling covering extend to the edges,i think it would have looked better, but it’s too late now and it is what it is.