You are currently browsing all posts tagged with 'diorama'.
Displaying 1 - 10 of 10 entries.

washboard

  • Posted on October 13, 2018 at 9:58 am

it’s hard to stay clean while traveling, so my ‘pukis asked for a washtub and board. i made the washboard first.

washboard supplies
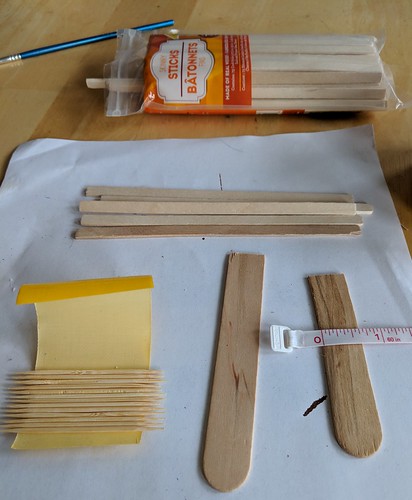
i started with toothpicks – placed on duck tape to make it easier to cut them all the same size,
skinny sticks
and 5/8″ wide craft sticks.
not shown is silver and black paint, wood stain, and fast tack glue.

washboard pieces cut dimensions
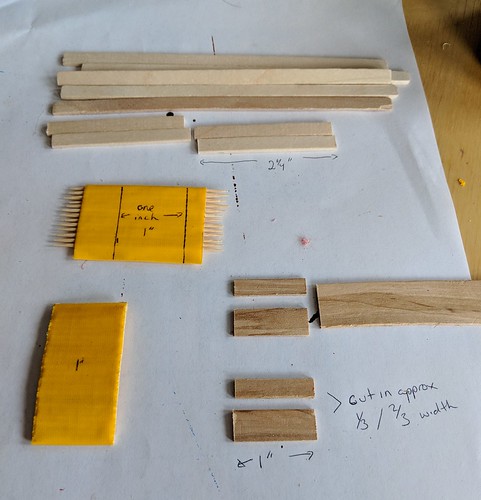
here are the sizes i cut to get to approx 1/12th scale. i used a pair of heavy duty scissors to cut on the drawn line for the toothpicks, and my small saw to cut the wood. you could use a small saw for all of it, or a good cutting knife.

washboard done
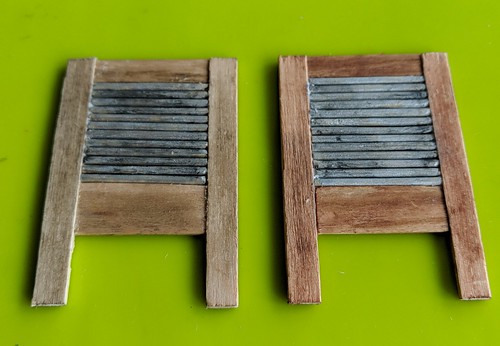
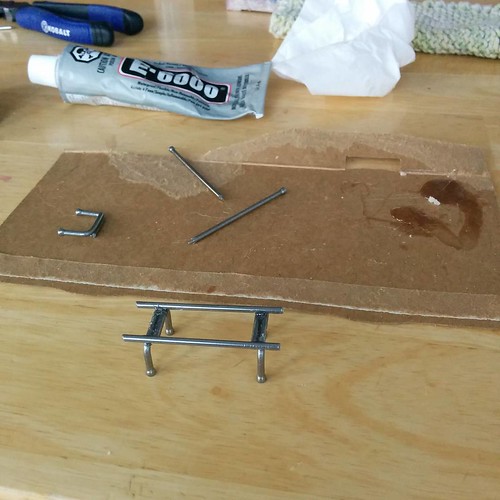
first i pre-painted the rollers silver and stained the wood. when that was dry, i glued the top and bottom wood pieces to the top and bottom toothpick. next i lined up toothpicks till i liked the length and glued on the sides. there is no need to glue the toothpicks to each other as the side pieces hold them all in place. make sure the glue covers the whole edge except for the bottom “leg” portion.

once the glue dried, i dry brushed on black paint over the silver to age it.

there you have a quick and easy washboard!

except…. it was too big!
and done again
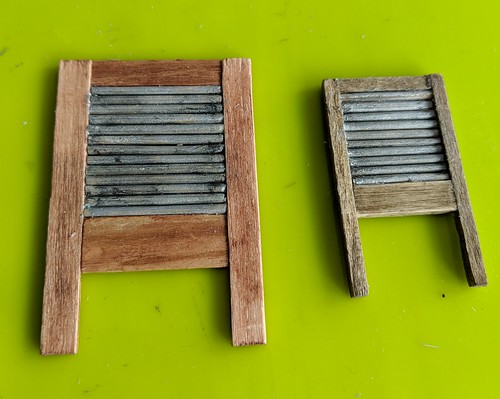
i somehow forgot that 1/12th scale is too big for my ‘puki’s :doh. the washboard was better suited for my realfees or my dream high elf so i’m thinking it’s actually more like 1/8th? anyhow i did the same thing again just cutting it all smaller.

this time i used the skinny sticks for the top and the bottom, and match sticks for the sides. the finished measurements are 1″ wide by 1-3/4″ long. the toothpicks, top and bottom pieces are cut 3/4″ wide. the bottom is a full skinny stick width, the top is a piece split roughly in half.

camp fire part 2

  • Posted on October 2, 2018 at 8:17 am

my logs are thoroughly cooked, so i cut them down to size, then used a hammer and chisel to split them. if you don’t have a chisel, you could always leave the logs whole.

camp fire logs
once they were the right size i arranged and re-arranged them till it looked right to me, then glued them together with fast tack glue and let it dry for 1/2 hour or so.

camp fire charring the logs
after the glue set, i carefully lifted the logs out and painted the inside with a combination of black and white paint to get the look of char and ash. to do that, i put a drop of black on my palette, then white beside it and swirled the two in the middle, with a toothpick, to get marbled shades of gray. i painted with the black first and wiped it off with a damp rag to get it nice and thin. then right at the bottom, and up the middle i dabbed on the grey swirly paint, tying not to brush so much that the colors completely blended. i also swirled some of the gray mix on the wood disc to make the fire more realistic. you can’t really see it under the logs, but i know it’s there, and you can see it if you get really close.

camp fire wood pile
with the extra wood, i built a little pile of firewood that my ‘pukis can use to keep their fire burning.

camp fire part 1

  • Posted on October 1, 2018 at 8:05 am

i’m ready to start making the camp fire now. i’m going to use an evans design led fire size 3mm. a 1.8mm would probably have been big enough, but i already had the 3mm and am trying to use what i have in hand before buying new.

the other things i need so far are a 3 inch diameter, flat, wood disk from michaels, and some small rocks from the gravel pad outside, (i picked out ones i liked for color shape and size and washed them to get rid of any bugs or dirt). also acrylic paint in black, dark brown, rust and white, and glue suitable for gluing rocks to wood, i used e6000.

camp fire
first i painted the top of the wood disk solid black for the charcoal, then while still wet swirled and blended in some dark brown and rusty brown to get the look of dirt around the edge. my realpukis are safety conscious 🙂

camp fire
i drilled a set of three holes in the center to thread my leds through. i should have done that before painting since i had to repaint around the holes with my black paint. when it dried again i arranged the rocks till i liked the look and then glued them down with e6000 glue. i let that set a bit and then painted the inner surface of the rocks to make them look soot covered.

camp fire leds back
finally i threaded the leds through the holes and taped them down in the back with a bit of tape. i just used regular tape since it doesn’t have to hold for long.

next step will be building the fire itself, but first i have to dry my “logs” in the oven. i took pruned, dead branches that have been sitting in my burn pile all summer (we have had a fire ban most of the summer so they never got burned). it is pouring rain so they are all wet, and i assume have bugs. i am going to bake them at 200F for 2-4 hours to make sure any bugs are good and dead! i’ll check them every 15 min or so to make sure they don’t catch fire. i wouldn’t mind if they got a bit scorched, but i would rather not burn my house down! 😉

rusty soup pot

  • Posted on September 29, 2018 at 8:50 am

with no kitchen in the caravan, my ‘pukis need to cook over an open fire. what better to cook with than a nice soup pot? i could have just bought one, but where is the fun in that? once i figured out the appropriate size, it was time to hunt for a suitable base.

pots
i found these bolt covers really cheap at the hardware store. they were the perfect size and shape for a soup pot. the top is the cap from a travel size spray bottle. i’m going to try all three and see which works best.

first i sanded them all to get rid of any imperfections and to get the surface ready for painting. i sprayed the bolt covers with a couple coats of rustoleum aged metallic rust, inside and out. the spray bottle cap was sealed with clear spray, painted with a light dusting of the aged metallic to make “rust” spots. and then put aside as i’m not sure yet what i am going to do with it yet.

bucket 2 patina
bucket patina
next i hand painted a combination of coppers/bronze, brown and teal metallic to get an aged look.

bucket side
for the first pot i glued on tiny copper hearts to form the bottom handles, and made the actual handle out of copper wire. now it can swing freely

bucket 2 side
for the second pot the handle was made out of #2 black eyes. the handle will be wire again. i’m debating trying to get some black wire for this one, doing the plain copper wire again or just trying to spray the copper with black paint….

fireplace final installment

  • Posted on December 23, 2015 at 5:19 pm

grate painted black looks like a well used cast iron grate.
Black grate
thread fire led lights through logs btw i ended up painted the lags with my ultra matte varnish because the ash kept getting all over my hands at this step Lol
Thread fire led lights through logs
put crumpled cellophane over the lights. this was included in the kit and just needed to be cut. i’d have preferred something more orange but couldn’t find any.
Cellophane over lights
punch holes for wires in back wall. i couldn’t find my awl so i used a large yarn needle and put in three small holes instead of one larger one. it really didn’t matter in the end.
Punch holes for wires in back wall
back view of wires threaded through
Back view
attach wires red to red, black to black
Attach wires red to red, black to black
tape everything down. the little white thing is an on off switch so the lights don’t go continuously.
Tape everything down
finished!
Finished!

i took a video of the fireplace with the lights flickering and it looks awesome. but apparently i can’t upload video to flickr, so i’ll have to figure out another place to upload it and then add it in.

working on the fire

  • Posted on December 22, 2015 at 4:52 pm

i want i light saber! we just saw star wars last night and they made cutting wood look so easy. this took far too long, i broke my pull saw and froze my fingers cutting these tiny things :(. then of course i forgot to take out a tape measure and had to guess on the size.. i like the look of the bigger logs better, but they ended up being too big. the smaller logs are just perfect. so i’ll be using them. i’ll save the bigger logs for another fireplace that i plan to do later.
Logs for the fireplace
i want my logs to look like they have really burnt so i am charring them in the flame of a candle. notice that i hold them with metal tongs and burn them in my kitchen sink just in case they decide to burn more than i planned! not likely since this wood is green and fairly wet from all the snow, but you never know…
Charing the logs for realism
here’s what one of the logs look like done.
A charred log
and the pile of finished logs. i wet them down thoroughly to make sure there were no sparks since the glue i’m using is flammable. so now i have to wait for them to dry before i can proceed.
Charred logs cooling and drying

my dh is building me a grate for my fireplace out of 2-1/2″ finishing nails. he still has to add the top rack. he designed it and did all the bending and cutting with his much stronger hands :o)
The start of a grate
and with the cross pieces added.
Grate!
just waiting for the glue to harden so i can paint it black

getting closer

  • Posted on December 18, 2015 at 5:19 pm

the front and mantel are now attached. but it is just resting on the hearth until i get the fire installed.
Getting closer
i’m really happy with how it is turning out, though i realized as i looked at it that i ended up making a fireplace that looks more well suited for a beach cottage, than the ancient english style manor that my crew is supposed to inhabit. lol oh well, i guess i’ll just have to make another one later on..

and a better view of the distressed finish of the wood on the mantel and the side. i really like how that turned out, especially considering the side is just the painted cardboard box!
Side view of wood
the mantel is a flat piece of wood with a square dowel glued to the front to form the overhang.

back to the fireplace

  • Posted on December 17, 2015 at 2:06 pm

i have been varnishing the fireplace and gluing the sides flat whenever i got a moment this week, not really something that showed up in pictures. now i finally got to apply the grout and find out if all those coats of varnish sealed my tiles/bricks well enough. in a couple of hours the grout will be dry enough to try and wash the haze off. if not i guess my tiles just got more subdued, which isn’t a bad look really… and i just added grouting to my list of new things i’ve tried!
Fireplace varnished and grouted
i like how much more finished the brick look now. i think if i was doing this again i would try to leave a bit more spacing between all the bricks to allow for the grouting. my bottom ones fit together a bit too closely.

edit: i went back to wipe off the haze and found i actually liked it better with some of the haze there. so ended up reapply a bit of the grout and wiping it off again to get the white back in the hollows. it has to dry overnight and then i’ll revarnish with my blend of matte and satin varnish to give a very subtle sheen.

while i’m waiting its time to start painting the hearth and mantel. for the hearth i wanted a stone look that coordinated with but didn’t match the stone in the fireplace, so i gathered up most of the same colors and added them to a paint palette made of a saran covered paper plate. i’ll be applying them with a cheap kitchen sponge to a piece of white painted mdf board.
Paint palette for the hearth.

and.. the painted hearth and mantel.
Painted hearth and mantle
i kept dipping the sponge in the paint and applying till i got the look i wanted. i’ve done marbling on full sized walls before so this time i had an idea of what i wanted to do :)) when it dries i’ll paint it with a blend of matte and satin varnish to get a really subtle sheen since the satin is too shiny and the matte too dull.

it’s hard to see on the mantel but i painted it with white chalk paint and then when it was dry sanded it smooth and it matches the wood front almost perfectly :yay! i’ll be coating that with my ulta matte varnish to keep the worn look.

fireplace continued

  • Posted on December 11, 2015 at 8:21 am

the rock front is painted and drying so i can varnish it. it may take quite a while to dry since my first try ended up looking way too colorful and didn’t go with whitewashed wood of the picture frame. i covered over all each brick with a combo of blue-gray and white so only hints of the colors show through and i like the effect much better. i didn’t have time to take a picture of the first try since i had to keep working while the paint was wet so all the colors would blend.
Rock painted
note to self, next time paint the rock before cutting it out. it would be much easier to get the variability in each rock!

1/4 scale fireplace

  • Posted on December 10, 2015 at 8:53 am

leaving the beds for a bit, just cause i want to get the woodworking done while i have no kids at home, and since christmas is coming, i’m going to tackle another project that has been on my list for ages…. a fireplace. i’m starting with a photo box using the lid only) a picture frame and a vague idea in my head of where i’m going….
Building a fireplace
i cut the frame down to make the front of the fire place. for the back i turned the lid over – it already was black inside which is a bonus since i may be able to leave that as is – then filled it in with a piece of packing foam. this is the same foam i used for my couch ages ago. i still have a bunch of it left over. it wasn’t quite deep enough so i put scrap pieces foam board on the back. i could have put the foam core on top but it wasn’t cutting as smoothly on the edges.
Mockup
i’ve always wanted to try doing egg carton bricks and this seemed to be the perfect place for them. unfortunately my first calculations were off and the 1/2″ x 1″ bricks i cut were just slightly too small. i ended up with either too much gapping or uneven rows and and asymmetrical pattern. so i recut them all at 1-1/8″ X 5/16″. that worked out perfectly and i got hem all cut out and glued down. however cutting two sets of bricks took all my time, and i’m out at drs again tomorrow so this gets put on hold for a couple of days most likely.
Brick "layed" and ready for painting