i’m starting a new project, one i’ve been wanting to do for ages, and just for fun i’m going to post step by step pictures in case it works and anyone else wants to try it 😉 it started off with these great sheets of packing foam that came round a new monitor my husband got last year when our old one died.
i could see the potential in them for building some great doll stuff, so i snagged them and stuffed them in the closet where they sat till i finally pulled them out to start working.
first i cut 3 pieces 6-1/2″ X 15″, and 3 pieces 6-1/2″ x 13″ for the seats. i’m using inches instead of cm this time, just because i’m using my quilting ruler to cut with and it is in inches.
then i cut 1 piece each 3-1/2″x15″, 3-1/2″x13″ & 3-1/2″x5-1/2″ for the seat backs
this is the rough shape of my couch/sofa. i’m just not sure whether i want the back of the short side to extend all the way out, like my mock up, or only go half-way out like some other couches i’ve seen. any thoughts?
glue 2 only of each of the seat pieces together in pairs then weight them flat to dry
- 1:4 scale
- abandoned dock
- abjd
- abraham lake
- accessories
- adoption meme
- advent
- advent calender
- advent candles
- advent log
- advent wreath
- aerin
- afghan
- Agoseris glauca
- alberta
- albert einstein
- alice
- alys
- amberglas
- american girl
- amigurumi
- ananda
- ane
- annalise
- ant
- ante
- ante elf
- ante ws
- b&w
- baby spruce
- baby yoda
- bamboo jersey
- banff
- beargrass
- bear grass
- becca
- beezie
- berries
- bid
- big hill springs
- birch
- bird
- birds
- bjd
- bjd. diy
- black
- black and white
- blanket
- bleeding hearts
- blossoms
- board games
- bohemian
- bonnie
- books
- bory
- bottles
- bow glacier falls
- boys
- brown eyed susan. wildflower
- buffalo berries
- bunnies
- burgundy
- buttercup
- butterfly
- calgary zoo
- campfire
- camp fire
- canada post
- canada thistle
- cape
- carcross desert
- catkins
- cereza
- chair
- challenge
- charity
- chipmunk
- chloe
- christmas
- christmas hampers
- christmas lights
- christmas tree
- christmmas
- clematis
- clothes
- clouds
- cobweb weight
- cofee dye
- color
- colors
- columbine
- cone
- conservatory
- cooking pot
- cookstand
- costume
- cotton
- couch
- cowl
- cow parsnip
- crabapple blossoms
- crafts
- craft table
- creche
- cricket
- crochet
- crochet blanket
- crocheted
- cross stitch
- crowned crane
- crystal
- crystalorn
- c s lewis
- dandelion
- daylight
- deardoll
- dear doll
- decorating
- decorations
- design
- desk
- dhs elf
- diaoram
- digory
- dinosaur provincial park
- dioram
- diorama
- diy
- doll
- doll a day
- dollar store
- dollarstore
- doll blanket
- doll furniture
- dollhouse rug
- dollmore
- dolls
- doll sweater
- donations
- dovey
- dressup
- duck
- eat.sleep.knit
- eatsleepknit
- eilidh
- el
- elbow falls
- elbow lake
- elephant
- elf
- elf ante
- elf el
- elin
- ellemeno
- ellowyne
- ellyce
- ember
- embroidery
- emily/emmie
- emmie
- emrys
- enyo
- ery
- erzulie
- esk
- esk badge
- esk cal space shawl
- esk galaxy shawl cal
- eskkal
- esk space shawl cal
- etsy
- eve the cat
- face up
- faceup
- failryland
- fairylan
- fairyland
- fairyland pukifee
- fall
- fallen log
- fallen tree
- false dandelion
- fan art
- farmland
- felting
- ferns
- few flowered anemone
- fireplace
- fishing pole
- fishing rod
- flamingo
- foamflower
- fog
- food bank
- forget-me-nots
- forget me not
- fort mcmurray fire
- fossils
- fundraiser
- fungi
- fungus
- furniture
- gaillardia
- games
- garden
- giraffe
- giving
- glacier lily
- glacier national park
- glamour challenge
- gold
- golden ragwort
- gold metallic
- gray
- green
- greenhouse
- grizzly bear
- gypsy caravan
- gypsy caravanpsy caravan
- hail
- haines
- halloween
- hat
- headphones
- hoar frost
- hollyhock
- honeydelf
- honey delf
- honeythorpe
- hoodie
- hoody
- indian paintbrush
- iplehouse
- irrealdoll
- irreal doll
- irreal doll ery
- irreal dollo
- journal
- kaka
- katie
- kid delf
- kiri
- knit
- knitting
- lace
- lace knitting
- laceknitting
- lace skirt
- laceweight
- ladyslipper
- lae louise
- lake louise
- larkspur
- lati yellow
- leaf
- leaves
- letters to troops
- light
- lightbox
- linen
- littlefee
- littlefee el
- littlefee el ws
- lucy
- luka
- luna
- luts
- m-line
- madelintosh lace thunderstorm
- magpie
- makeover
- malabrigo mecha
- mas
- meadow parsnip
- meercat
- meg
- memories
- mica dam road
- minature props
- miniatre
- miniature
- miniature accessories
- miniature props
- miniatures
- mini chairs
- minifee
- mini garden
- mirwen
- mnf
- moeline
- mohair wig
- monkeyflower
- monster
- monument
- mountain heather
- mr tumnus
- msd
- msd. minifee
- mudstone
- mushrooms
- nandi
- narsha
- narsha friend
- never alone
- noah
- noni
- ocean
- old man's whiskers
- operation christmas child
- orange
- orchid
- oukifee
- pajamas
- pale yellow
- pattern
- peacock
- pearly everlasting
- penguin
- photo challenge
- photochallenge
- photography
- photo lights
- photo prop
- photoshop
- pi day
- pie day
- pink
- pio
- pipi
- pitta
- pkf
- poetry
- pom pom
- poppies
- prairie
- prairies
- prop
- props
- pukifee
- pukipuki
- pumpkin
- pupu
- purple
- pussy willows
- queen's cup
- quilt
- quilting
- quinn. bjd
- quote
- rain
- ravelry
- reafee
- realfee
- real puki
- realpuki
- red
- red panda
- red pandas
- reflection
- reflections
- remembrance day
- rockies
- rose
- rose hip
- rose hips
- roses
- rs
- ruby
- rug
- scenic
- sd
- seed
- seedhead
- sewing
- shabee
- shade garden
- shaelyn
- shawl
- sheep
- shiwoo
- shoebox gift
- shooting star
- shrubby cinquefoil
- silk hankies
- silk thread
- silky lupin
- silver
- skagway
- skylar
- sledding
- smidge
- smilga
- snow
- snowy owl
- sofa
- soom imda 3.0. collette. molly
- sophie
- sos
- soso
- souldoll
- soulkid
- soup pot
- space shawl
- sparrow
- spider web
- spring
- stitch markers
- stocking cap
- stockings
- stone
- stonecrop
- subalpine spiraea
- sunrise
- sunroom
- sun room
- sunset
- swap
- swaps
- table
- teddy
- temperature blanket
- temperature tracker
- texture
- thanksgiving
- the best laid plans.
- the great purge
- thistle
- thread crochet
- thread lace
- three flowered avens
- tiarella
- tiera
- tiger
- tin boxes
- tins
- tiny delf
- tinydelf
- tinys delf
- townsend's solitare
- toy
- travel
- tree
- treehouse
- trees
- trehouse
- tres
- tumnus
- tunic
- tutorial
- tutrial
- twinberries
- upcycle
- washboard
- water
- water drops
- waterfall
- waterton
- waterton national park
- wedge pond
- western anemone
- western spring beauty
- wheelchair
- white
- whitehorse pass
- white skin
- white wolf
- wig cap
- wigs
- wild bergamot
- wild flower
- wildflower
- wild flowers
- wildflowers
- wild heliotrope
- wild rose
- wild strawberry
- william blake
- willow
- winter
- winter fun
- winter photography
- wisp
- wooden spools
- woodland
- wood violet
- wool
- work in progress
- wren
- yarn
- yarnathon
- yellow
- yo-sd
- yukon
- zoe
- zoo
my next project and a step by step tutorial in excrutiating detail ;o)
Continue reading my next project and a step by step tutorial in excrutiating detail ;o) »
building a treehouse part 4
so as i planned last session i glued support beams across the back to straighten out the slats. it does that very well, but since i didn’t plan it out it looks unfinished now. good thing i never really expected this one side to show. if i was doing it again i would make this like the side walls and sandwich the slats between the flat beams at the top and bottom, recessing it to allow the back beams to be flush with the side pillars
you can see that the slats are much straighter now. i pressed them really flat with a stack of heavy books till the glue was firmly set.

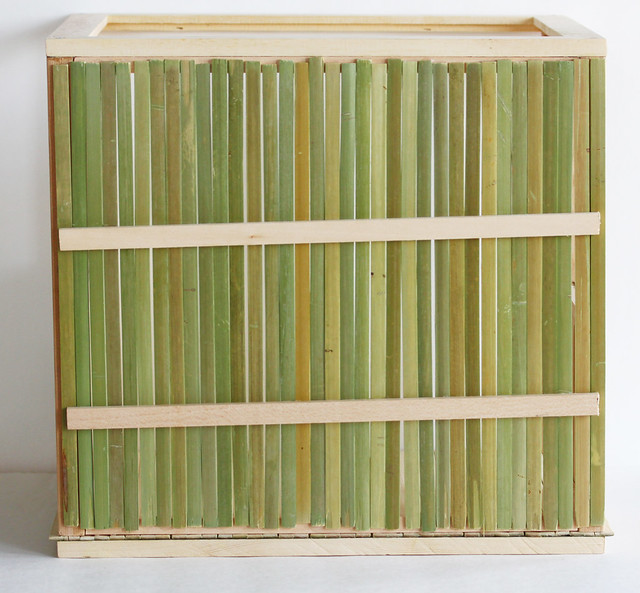
once the glue on the back wall was hard, i finished the side walls as i said above by gluing slats between 2 narrow strips of wood, top and bottom. i thought at first i’d have to paint the wrong side since they have a greenish coating, but it ends up just looking like weather treated lumber so i’ll probably leave it. the stairs will go up to the open doorway and the last side will have a railing instead of a wall to let more light in
this shows the slats sandwiched between two beams from the top. i need to figure out how to finish that edge. the large beams are wide enough but they look too bulky, and the narrow beams aren’t wide enough. i need something wide and flat, almost like a veneer or something.
next step will probably be to get a cutting board or similar chunk of wood for the base, cut the tree stump and build the stairs.
building a treehouse part 3
i got the back wall done. i glued small square dowels to the top and bottom of the frame and then trimmed the skewers the right length before gluing them on. it’s a good thing i didn’t make the wall any higher or i would have had to piece it. the skewers were just long enough to fit. i really lucked out there since i didn’t think to check before making the frame. i think i need to glue a crossbeam across the middle of that wall to even out some of the warping. i picked the slats that were the straightest end to end, but didn’t check for bowing.
noah insisted on helping, but was so tired towards the end he fell asleep.
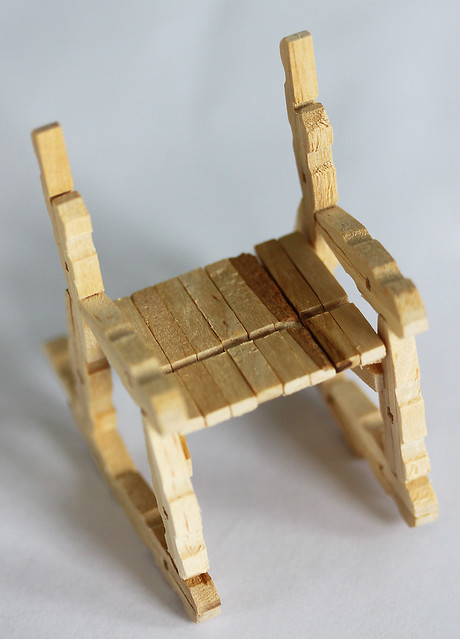
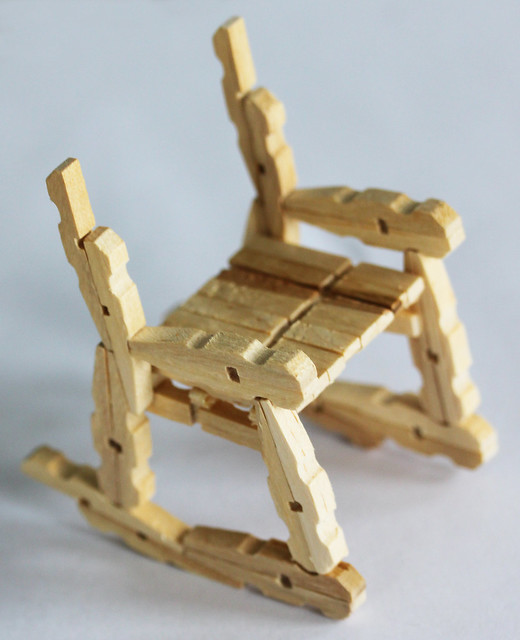
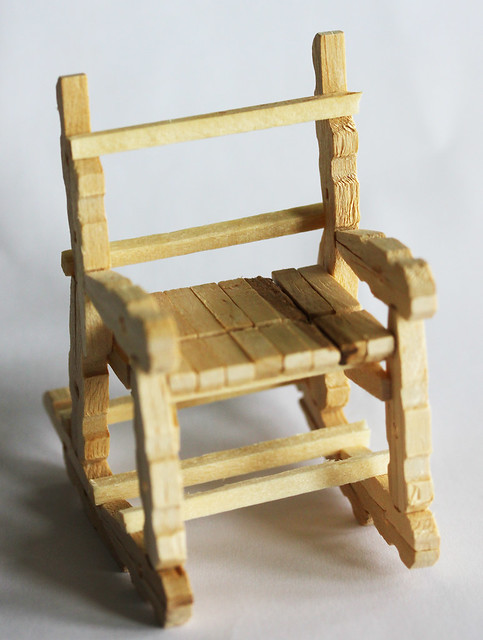
miniature clothespin rocker
i took a short break from the treehouse to make a rocking chair from clothespins and woodsies match sticks for my real pukis. it’s a variation on a clothespin rocker i’ve seen posted in several places, but i switched out some of the clothespin pieces for woodsies to make it more symmetrical, so i thought i would post a quick tutorial.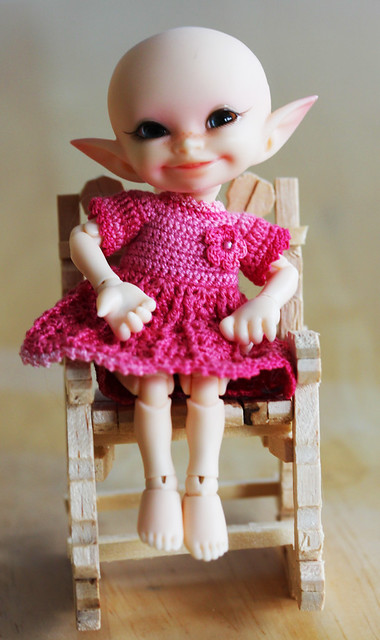
smidge is graciously modelling without her hair since otherwise you can’t see the chair at all 😆
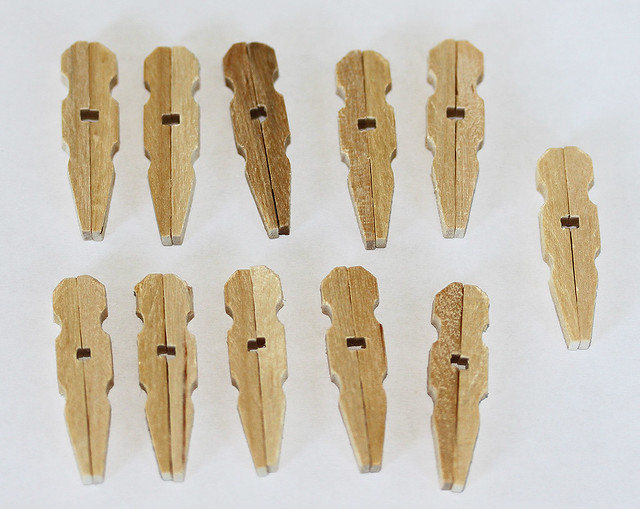
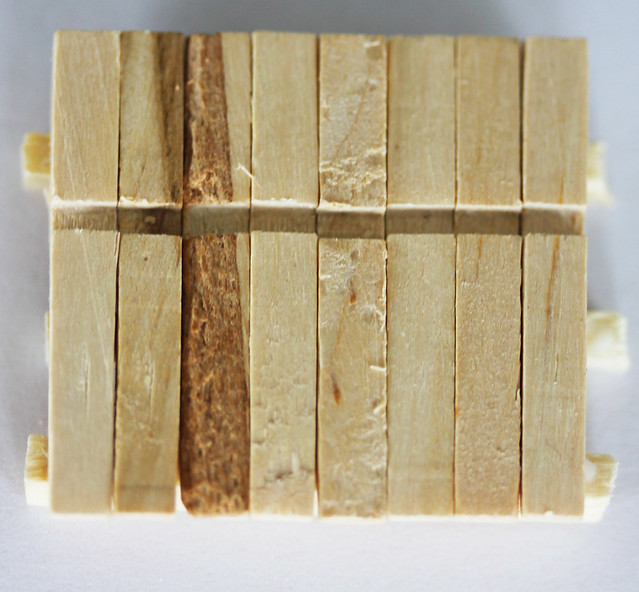
first remove all the springs from 24 miniature clothespins then glue 11 sets together back to back. i used aleene’s fast tac glue since it sets fairly quickly and dries really hard and clear.
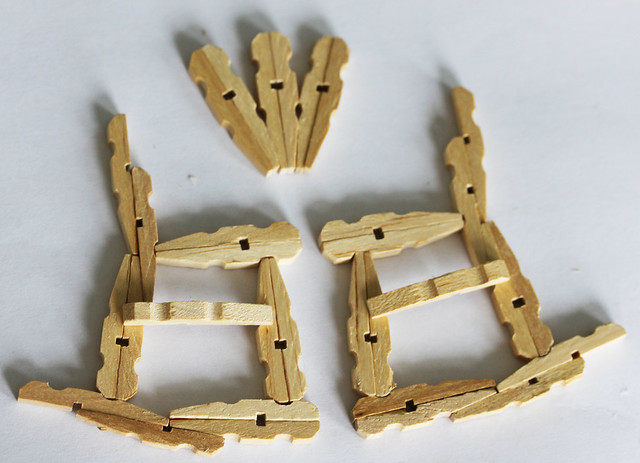
following the picture glue three sets together for the chair back and the rest together as shown for the sides. (you will also be using 10 half pins to finish up the sides.) make sure the sides are mirror images of each other and that the crossbar is the same height for both sides.

cut three “woodsie” matchsticks the same length as the width of the widest part of the chair back. these will be the seat supports
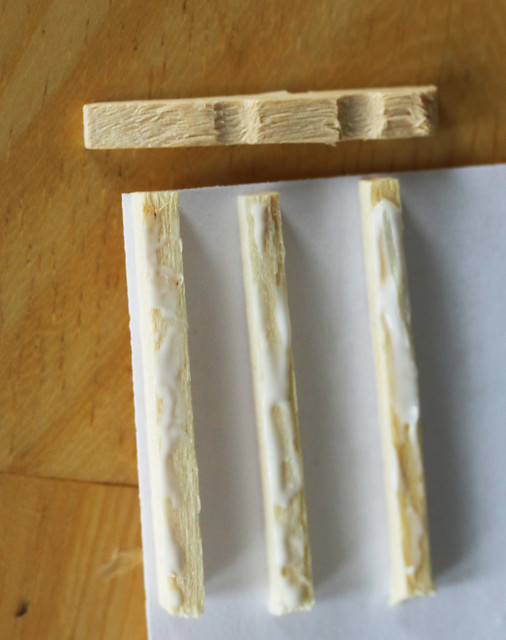
i lined the seat supports up on the corner of a piece of paper to make sure they were squared properly. two should fit in the dips of the clothespin and the third almost at the thinest part of the end. run a line of glue down each wood strip
cover your wood strips with clothespin halves. mine took 8 halves for this size but a larger size only took 5.
turn the sides so that the crossbars face in and glue the seat on
another view of how the seat is attached
cut 5 woodsies long enough to reach across the frame. you will be putting the seat back pieces on the natural ledges formed by the clothespin ends. one on the front, one on the back. (if that doesn’t make sense let me know and i’ll try and take another picture. the other 3 brace the rockers. two inside the legs and one across the back right against the legs.
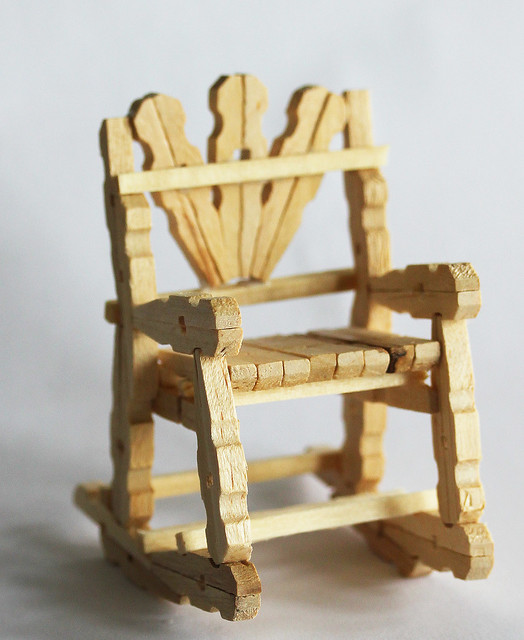
last glue the seat back in place. the should just touch the outer uprights and rest on the lower seatback brace. gluing it to the upper brace though is what really holds it in position. and now your chair is done.
you can make it with larger clothespins for larger dolls but you will have to get bigger wood for the braces as well.
have fun and if you want to show yours off, feel free to post a link :o)
building a treehouse part 2
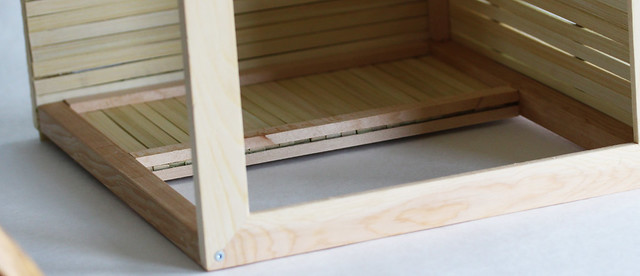
i finished up the base by cutting a piece of foamcore to fit in the hole of the frame,then glued it down. you can see it fills the space pretty exactly. this is so neither the flooring or the base will bow when i attach the tree stump
then i added back the hardboard backing and glued this to the foamcore, using a stack of books as weights to hold it all flat as the glue dried.
i trimmed the boards so that they were close to the frame, then cut 1/2″ square strips of wood 11-1/2 inches long for the side supports. i first attached them to the corners of the second frame then the corners of the floor. i tried screwing them in but didn’t have the right size square head attachment for my drill so ended up drilling holes slightly too small and then hammering the screw in. odd but it worked.
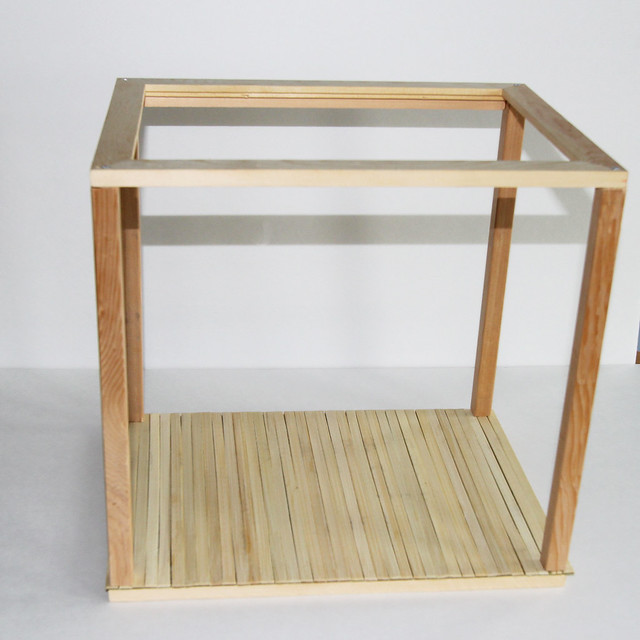
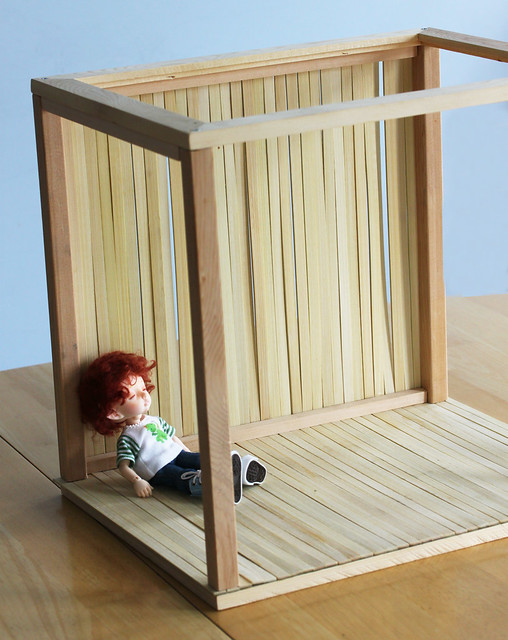
here kiri and noah demonstrate the size. i probably could have made it a smidge shorter, but the proportions are nice this way so i’m happy with it.
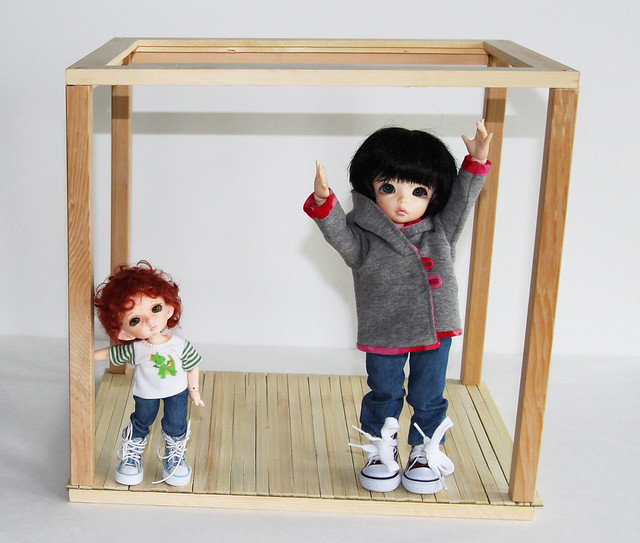
building a treehouse
i have several large bushes with severe die-back from a storm, and that combined with this picture from a japanese mook, 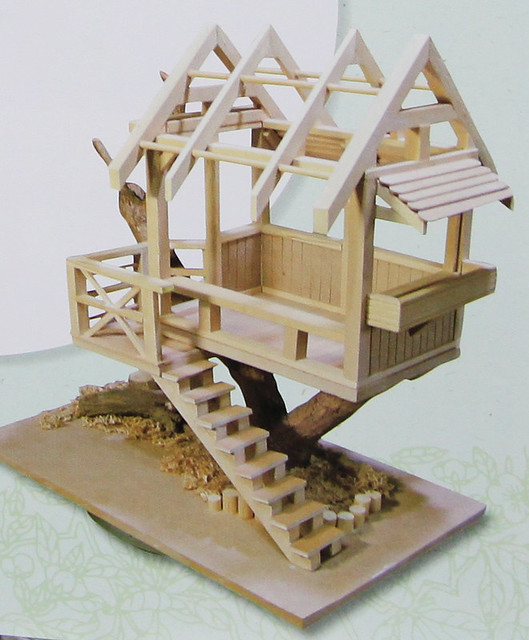 inspired me to make a treehouse for my tinies.
of course being me i’m not sure the house will be recognizable by the time it’s done and it has already grown from just fitting my realpukis to being big enough for my pukifees and littlefees to play in. i promised the rps a smaller one later. anyhow i thought it might be interesting to chronicle how i made it as possible inspiration for someone else or just for my own interest 😉
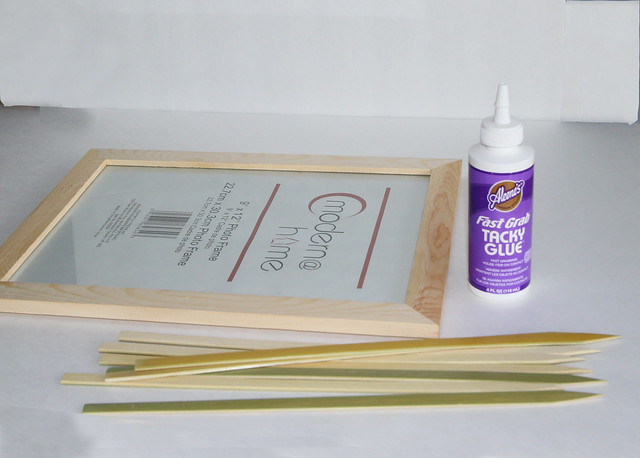
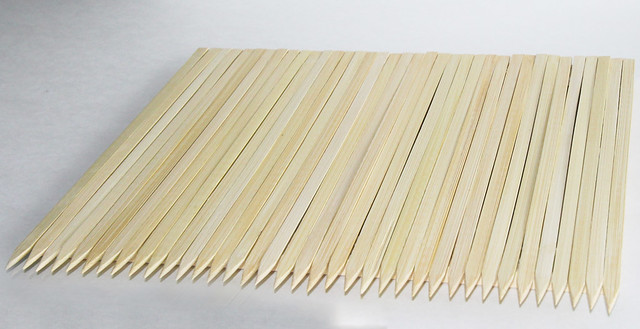
i found some great flat frames at the dollar store to use as the floor and roof supports, and flat bamboo skewers to use as planking.
i glued them down in sections, periodically checking that they are staying reasonably straight, the skewers themselves aren’t perfectly straight – though i did discard the really warped ones – so i’m planning to make it look as though a child helped build it.
here is the floor laid down and glued in sections (just ’cause my weights are too small to do it all at once.) i’ll be cutting the points off later
last picture today is of the “weights” holding the wood as flat as possible t omake good contact while the glue dries