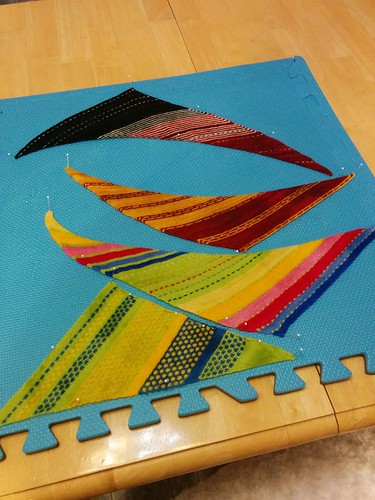
it will be a day or two before i’m home long enough to take pictures, but in the meantime here is a quick look at the shawls being blocked.
You are currently browsing all posts tagged with 'msd'.
Displaying 31 - 40 of 68 entries.
- 1:4 scale
- abandoned dock
- abjd
- abraham lake
- accessories
- adoption meme
- advent
- advent calender
- advent candles
- advent log
- advent wreath
- aerin
- afghan
- Agoseris glauca
- alberta
- albert einstein
- alice
- alys
- amberglas
- american girl
- amigurumi
- ananda
- ane
- annalise
- ant
- ante
- ante elf
- ante ws
- b&w
- baby spruce
- baby yoda
- bamboo jersey
- banff
- beargrass
- bear grass
- becca
- beezie
- berries
- bid
- big hill springs
- birch
- bird
- birds
- bjd
- bjd. diy
- black
- black and white
- blanket
- bleeding hearts
- blossoms
- board games
- bohemian
- bonnie
- books
- bory
- bottles
- bow glacier falls
- boys
- brown eyed susan. wildflower
- buffalo berries
- bunnies
- burgundy
- buttercup
- butterfly
- calgary zoo
- campfire
- camp fire
- canada post
- canada thistle
- cape
- carcross desert
- catkins
- cereza
- chair
- challenge
- charity
- chipmunk
- chloe
- christmas
- christmas hampers
- christmas lights
- christmas tree
- christmmas
- clematis
- clothes
- clouds
- cobweb weight
- cofee dye
- color
- colors
- columbine
- cone
- conservatory
- cooking pot
- cookstand
- costume
- cotton
- couch
- cowl
- cow parsnip
- crabapple blossoms
- crafts
- craft table
- creche
- cricket
- crochet
- crochet blanket
- crocheted
- cross stitch
- crowned crane
- crystal
- crystalorn
- c s lewis
- dandelion
- daylight
- deardoll
- dear doll
- decorating
- decorations
- design
- desk
- dhs elf
- diaoram
- digory
- dinosaur provincial park
- dioram
- diorama
- diy
- doll
- doll a day
- dollar store
- dollarstore
- doll blanket
- doll furniture
- dollhouse rug
- dollmore
- dolls
- doll sweater
- donations
- dovey
- dressup
- duck
- eat.sleep.knit
- eatsleepknit
- eilidh
- el
- elbow falls
- elbow lake
- elephant
- elf
- elf ante
- elf el
- elin
- ellemeno
- ellowyne
- ellyce
- ember
- embroidery
- emily/emmie
- emmie
- emrys
- enyo
- ery
- erzulie
- esk
- esk badge
- esk cal space shawl
- esk galaxy shawl cal
- eskkal
- esk space shawl cal
- etsy
- eve the cat
- face up
- faceup
- failryland
- fairylan
- fairyland
- fairyland pukifee
- fall
- fallen log
- fallen tree
- false dandelion
- fan art
- farmland
- felting
- ferns
- few flowered anemone
- fireplace
- fishing pole
- fishing rod
- flamingo
- foamflower
- fog
- food bank
- forget-me-nots
- forget me not
- fort mcmurray fire
- fossils
- fundraiser
- fungi
- fungus
- furniture
- gaillardia
- games
- garden
- giraffe
- giving
- glacier lily
- glacier national park
- glamour challenge
- gold
- golden ragwort
- gold metallic
- gray
- green
- greenhouse
- grizzly bear
- gypsy caravan
- gypsy caravanpsy caravan
- hail
- haines
- halloween
- hat
- headphones
- hoar frost
- hollyhock
- honeydelf
- honey delf
- honeythorpe
- hoodie
- hoody
- indian paintbrush
- iplehouse
- irrealdoll
- irreal doll
- irreal doll ery
- irreal dollo
- journal
- kaka
- katie
- kid delf
- kiri
- knit
- knitting
- lace
- lace knitting
- laceknitting
- lace skirt
- laceweight
- ladyslipper
- lae louise
- lake louise
- larkspur
- lati yellow
- leaf
- leaves
- letters to troops
- light
- lightbox
- linen
- littlefee
- littlefee el
- littlefee el ws
- lucy
- luka
- luna
- luts
- m-line
- madelintosh lace thunderstorm
- magpie
- makeover
- malabrigo mecha
- mas
- meadow parsnip
- meercat
- meg
- memories
- mica dam road
- minature props
- miniatre
- miniature
- miniature accessories
- miniature props
- miniatures
- mini chairs
- minifee
- mini garden
- mirwen
- mnf
- moeline
- mohair wig
- monkeyflower
- monster
- monument
- mountain heather
- mr tumnus
- msd
- msd. minifee
- mudstone
- mushrooms
- nandi
- narsha
- narsha friend
- never alone
- noah
- noni
- ocean
- old man's whiskers
- operation christmas child
- orange
- orchid
- oukifee
- pajamas
- pale yellow
- pattern
- peacock
- pearly everlasting
- penguin
- photo challenge
- photochallenge
- photography
- photo lights
- photo prop
- photoshop
- pi day
- pie day
- pink
- pio
- pipi
- pitta
- pkf
- poetry
- pom pom
- poppies
- prairie
- prairies
- prop
- props
- pukifee
- pukipuki
- pumpkin
- pupu
- purple
- pussy willows
- queen's cup
- quilt
- quilting
- quinn. bjd
- quote
- rain
- ravelry
- reafee
- realfee
- real puki
- realpuki
- red
- red panda
- red pandas
- reflection
- reflections
- remembrance day
- rockies
- rose
- rose hip
- rose hips
- roses
- rs
- ruby
- rug
- scenic
- sd
- seed
- seedhead
- sewing
- shabee
- shade garden
- shaelyn
- shawl
- sheep
- shiwoo
- shoebox gift
- shooting star
- shrubby cinquefoil
- silk hankies
- silk thread
- silky lupin
- silver
- skagway
- skylar
- sledding
- smidge
- smilga
- snow
- snowy owl
- sofa
- soom imda 3.0. collette. molly
- sophie
- sos
- soso
- souldoll
- soulkid
- soup pot
- space shawl
- sparrow
- spider web
- spring
- stitch markers
- stocking cap
- stockings
- stone
- stonecrop
- subalpine spiraea
- sunrise
- sunroom
- sun room
- sunset
- swap
- swaps
- table
- teddy
- temperature blanket
- temperature tracker
- texture
- thanksgiving
- the best laid plans.
- the great purge
- thistle
- thread crochet
- thread lace
- three flowered avens
- tiarella
- tiera
- tiger
- tin boxes
- tins
- tiny delf
- tinydelf
- tinys delf
- townsend's solitare
- toy
- travel
- tree
- treehouse
- trees
- trehouse
- tres
- tumnus
- tunic
- tutorial
- tutrial
- twinberries
- upcycle
- washboard
- water
- water drops
- waterfall
- waterton
- waterton national park
- wedge pond
- western anemone
- western spring beauty
- wheelchair
- white
- whitehorse pass
- white skin
- white wolf
- wig cap
- wigs
- wild bergamot
- wild flower
- wildflower
- wild flowers
- wildflowers
- wild heliotrope
- wild rose
- wild strawberry
- william blake
- willow
- winter
- winter fun
- winter photography
- wisp
- wooden spools
- woodland
- wood violet
- wool
- work in progress
- wren
- yarn
- yarnathon
- yellow
- yo-sd
- yukon
- zoe
- zoo
block party
sweet as candy
in spite of the fact that i had to constantly frog this one back to get the vision in my head to match the work on my needles, this shawl was done fairly quickly. it is the biggest of the shawls so far and my current favorite. the colors on this one were inspired by this years yarnathon theme of “candyland” but i think it would look stunning with jewel tones on black, or a gradient of blues on cream. i’m pretty sure there will be more in the girls future….
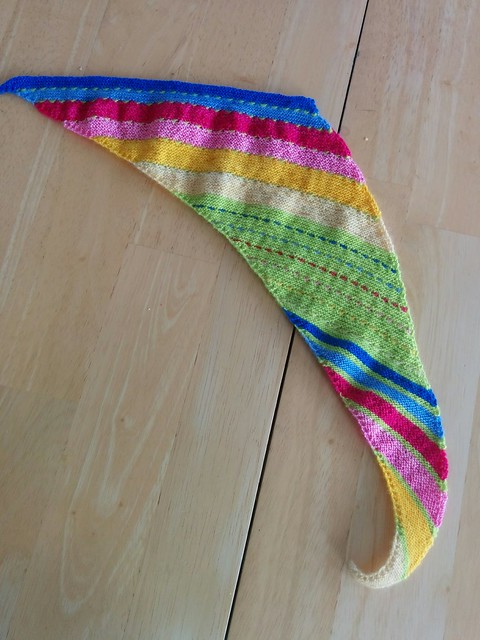
like the last one, the size of my candy shawl would work equally well as a shawlette or scarf for bigger dolls like an sd or american girl. i’m in the process of turning my notes for the last two into actual patterns, that i hope to have available soon on etsy and ravelry
winter quarter kal
the eatsleepknit kals are wonderful this year. since they are vaguely freestyle and we can combine projects to get the required yardage, i’m able to do lots of doll knitting/crocheting and have it qualify. i’m hoping to join all the kals, will have to see whether the flash kals work out too. this is going to help me get lots of yarn knit up this year. yay!
the winter season has two kals, melanie berg patterns and persian dreams. i’m knitting some nice warm winter shawl-scarves for my minifee girls for the first one. so far the patterns are more “inspired by” than actually following 😉 but that is always the way i knit and they are coming out quite nicely i think.
back at last?
please forgive me for my long absence, these last few months have been challenging to say the least. my middle child has had some serious health issues that have taken up most of my time. we are hoping/praying that he is stable right now and i may be able to get back to making doll stuff and checking in to my various forums on the net, at least a little bit, anyway.
so one of my favorite yarn stores eatsleepknit is having their yearly yarnathon, and this year looks like a winner as far as i’m concerned. they are allowing us to add projects together for the kals, cals and booster club prizes, so i can work on my doll stuff and actually have it count! 🙂 🙂 🙂
i’ve started a new blanket for the girls couch. i’m only being cautiously optimistic ’cause i started a christmas one O_O. and i’m working on some shawls that will hopefully get done in time to wear before summer hits. everything is being done in malabrigo lace so far. its the softest lace yarn i know of that doesn’t have cashmere in it, and eatsleepknit has tons of colors!
here’s a sneak peek at my christmas blankie.
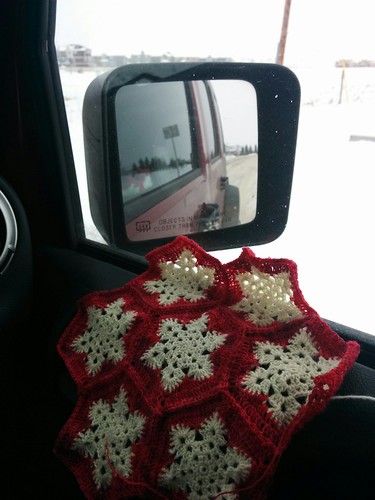
i worked on it over the holidays, so took my “on the road” pic already in hopes that they have that badge again this year. if not it seemed appropriate anyway to do a snowflake afghan in the snow.
couch tutorial part 8 where we finish it up!
sew back pieces together at 90 degree angle
i whip stitched the bottom and used a ladder stitch on the top where it would show.
the ladder stitch continues down the back but i didn’t do any stitching on the front. i liked the way it looked unstitched and it held firmly enough without any stitching. i was planning to put a line of glue between the two seats, but once i got it all together it turned out not to be necessary.
sew back to seat with a ladder stitch. a little bit time consuming but it gave a really nice finished edge so it was worth it. and the seats were really nice and sturdy once i was done. if you choose to glue instead of sew you would need to put another cover on the back and sides. a piece of matboard covered with fabric would probably work
sew all the way across the back. its hard to see in the picture but the stitching goes across the short ends of the seat backs all across the back and then just up the other short end. i left the front unstitched again. it held really well and i liked the look
and the finished couch. i’ll take some better pictures when i get a couple of throw pillows made, but i’m really pleased with how it came out :0)
of course the girls are now busily measuring the leftover foam to see if there is enough for a chair, an ottoman, and a fireplace like wovenflames! 😆
if you do use this tutorial, even as a jumping off point i’d love to see pics of what you come up with! you are welcome to sell finished pieces you make. design credit would be appreciated, but is not required, put please do not repost this tutorial/sell it or claim it as your own. i retain copyright to this tutorial and all it’s images. thank you
Continue reading couch tutorial part 8 where we finish it up! »
couch tutorial part 7 finish the seat backs
grade the overlapping edges
once the tufts are all sewn grade any overlapping edges to cut down on the bulk. i realized after i got all the back pieces covered that the only overlapped edges were on the long sections and i had graded the short ones too :p oh well, it actually wasn’t noticeable and i wasn’t going to redo it so i’ll have to live with it, but you might want to see which ones really need it before cutting! i did grade the correct ends at least by wrapping loosely around the foam, placing the backs on the seats then marking the end to be cut of with a tiny x on the inside -it got cut off anyway so didn’t show.
start at the bottom edge where you will want to finish, line up the padded seat portion and pin it on then wrap. i use lots of pins to keep everything flat and snug then trimmed off the fabric i didn’t need before sewing. my foam was thick enough that i could bury the pins without poking myself and leave them there till my stitching was done.
stitch with a flat whip stitch you want the fabric to be pulled snug but not super tight, and to be as flat as you can make it on the bottom. that will make attaching the backs easier.
close up of the finished seat back
next post we will attach the seat backs and the couches will be done 🙂
Continue reading couch tutorial part 7 finish the seat backs »
couch tutorial part 6 start the seat backs
the seat backs do need the ends covered, since they will show. so i cut pieces of fabric big enough to wrap around like this. i glued where the foam is resting on the fabric on both sides, (hope that make sense, if not take a look at the next picture) but not the end since i didn’t want the glue to bleed through.
cut a rectangle out of each corner then glue those long flaps down
you will need to cover each piece of seat back, however many you choose. in my original picture i had 3 but i added an arm/end to the longer couch so now i have 4 🙂
now to make the covers while the glue dries
these are very similar tho the seat covers. 3 layers of warm and natural with an extra layer of the cover fabric to prevent show through since my fabric is fairly thin. you wouldn’t need that extra fabric if your fabric was darker or thicker. the difference is the placement since this time my seam will be on the narrow edge instead of in the middle of the back.
i decided to only do the tufting partway up the backs. looking at my clippings file, that was the style i preferred. but even so there are 62 more tufts to go!
Continue reading couch tutorial part 6 start the seat backs »
couch tutorial part 5 a change of plans, and we add the feet
after i got the skirt sew on i decided the seats just looked too blocky the way they were. so i took off the bottom layer of foam (luckily the glue hadn’t completely hardened yet) and folded the skirt under instead. here it is pinned tight to glue
i cut pieces of posterboard a few millimeters smaller than the foam piece to cover the base (for those of you using inches that would be about 1/8″ on either end)
the posterboard glued in place. this was weighted down with my trusty stack of hardcover books to dry 🙂
sticking to my plan to only use what i already had on hand for this couch, i auditioned feet from the supply in my craft drawers, instead of following my initial impulse of running to michaels or the dollar store to get small wooden blocks. the ones on the left hand side won. both because i liked the style better and i had four more of them, so there were enough to put six feet on the each couch instead of only four
and the feet glued on…
Continue reading couch tutorial part 5 a change of plans, and we add the feet »
couch tutorial part 4 skirting
the glue is all dry now it’s time to add the skirt. having cut a piece wide enough to go to the floor and also fold over quite aways, i press it the right length. the extra fold will be in the center back. the fabric i used had enough selvedge edge for both skirts so i didn’t have to hem it – bonus!
pinned all around to check the length. then unpinned on end and pressed under again to finish edge. i left it a bit long since a plan to add feet underneath which will take up the slack
flip up and sew…
back stitch along fold line to edge of seat. (to be continued when i finish this step)
couch tutorial part 3 attaching the seat covers
the tufting is all done. this is really the only part that wouldn’t work to glue, but you could make your dots farther apart if you aren’t as obsessive as i am 😉 you could also add small buttons or beads on each tuft to mimic the buttons on a couch. personally i hate sitting on pillows with buttons so i refuse to inflict them on my dolls 😆
now tuck the ends in this hides all those ugly frayed ends and makes it look neat from the outside. make sure it is exactly as wide as your foam piece.
and pin in place, line up your batting even with the top of the foam and pin it in place so it doesn’t shift before you turn it over and stretch the back around.
whip stitched closed. this doesn’t have to be super neat as it won’t show. it’s more important that it be relatively flat, and that it hold the fabric tight. you could also glue this step if you’d rather and just leave the pins in to hold it tight till the glue dries, but i think stitching is more secure.
glue and weight …and wait 😉
the top layer added to each seat and weighted again so it will dry flat. once again there are TWO seats here, just stacked for space and so i can use the same weight for both. if you look at the end you will see i carefully covered the foam piece before i wrapped my tufted piece around it. i realized after i did, that the ends would be completely covered in the next step so it wasn’t necessary and i didn’t show that step.
next step coming after the glue dries….
Continue reading couch tutorial part 3 attaching the seat covers »