finally got a chance to try and fix the wheels on the caravan. several people had suggested just trying to make them look dirtier/more worn to fit the rest of the caravan, so i thought i would try that first. i put the caravan up on a couple of paint jars, so i could access all the edges at once, and then with dark brown stain did a combination of dry brushing, smudging and painting on a very watered down version till i like the effect. i think the wheels fit in better now. what do you think?
christmas lights… wow!
that is my son’s comment every time he sees lights. since it is december i promised him we would set up the tree, but life intruded and we just haven’t done it yet. as a compromise i decided to add lights to the mini tree and put them out on the table. he seems happy for now.
i had dental surgery today and apparently did some rather odd things while under the sedation, but i’d recovered enough by tonight that meg said she would help me untangle the lights. i was grateful for her help because they were rather a mess. the little tree wasn’t too bad. it was 16 feet long, and while it uncoiled like a spring when we took it off the cardboard, it was at least in more or less a straight line. we wrapped it round the tree, looping around the branches and the length was pretty much perfect!
the lights can be either white or multicolored and have an option of several different patterns solid, blinking, fade in and out etc. the lights on colored mode are a little pale, but i like the concept.
the larger sting was more of a challenge. it was 33 feet long, which i figure would be about right. but they had wrapped it double around the cone so first we had to untwist the whole length which was springy and kept trying to re-twist. then get it wrapped evenly around the tree without tangling again! the whole thing reminds me why our full-sized trees are pre-lit. these one are going to get stored pre-decorated as well.
finally after much work, and several cup of cocoa on megs part, and ice-cream fudge bars on mine (dental surgery, remember, no hot liquids 🙁 ) we were done and the results were definitely worth it. the string would have been perfect if it just had 3 more lights, but i doubt anyone will notice, other than meg and me.
this tree has lots of different patterns in the lights as well, but they are always colored, since the covers give the color not the leds. as a result they are much brighter.
when i am feeling better, we plan to set the tree up in front of the fire place and try and corral the littles for some christmas pics (if we can get them out from behind the tree where the controls are!)
in the mean time, we’ll leave you with one last picture of our lovely lit trees
something different
i took a break from cleaning and doll stuff to make a batch of ornaments for a charity fundraiser.
living channel services is a charity started a couple of years ago by a friend to help children in rural rwanda who have severe mental &/or physical handicaps. these children live in the most appalling conditions and have very little hope for the future. we are raising money to help their parents pay for their medical care, fund microfinance cooperatives to help the families get out of poverty, and long term, build dayprogram facilites where the kids can come to get therapy and care while their parents work.
for a couple of upcoming december fundraisers i made these ornaments that we will give for each donation of at least $20. the idea being donors can keep them and hang them up or give them as gifts to family and friends.
we have a tradition in our family that every year we make donations in honor of each family member and then give them a card/ornament that symbolizes the gift. many family members look forward to seeing what they “got” each year and find they are the most meaningful gift they receive.
here’s a close-up of some of the ornaments
(the pictures are all snapshots of actual kids/families we are helping.)
and the card that goes with it
if you are interested, follow the link over to the website and check us out 🙂
and so it begins again
i finished up the ornaments on my mini tree (see post earlier this month) and in keeping with my resolution to purge i bundled up most of the extra beads and dropped them off at the charity store, yesterday. i was planning to just drop and run, but they had a big sign up front that all their christmas stuff was now out… so i just had to go take a look. on one of the tables was an 15″ tree, one of the ones with perfect scale tiny branches and it was marked at only $2. of course i immediately decided my girls needed a second tree. the 24″ one is a bit big for some of the smaller kids.
once i got home and confirmed that this indeed was a perfect tree, i panicked. i realized that i had just given away all the extra ornaments :doh you see why i so seldom purge?
i found some lovely angel charms on sale for cyber monday and quickly ordered a few. but luckily before i went too crazy reordering ornaments i took a look through the beads and charms that i had decided to keep and found i had a lot more than i thought. enough to pretty much fill the tree, which is what i did this morning.
i have a few spots left for the angel charms when they come, the angel on top desparately needs repainting, and of course i will need to add lights (which i have in my box) and make another tree skirt. but overall i’m happy and my desire to purge is back on track 🙂
and another one done
got up this morning and finished the pom pom for the last hat. since this one was so bright, meg let me go just a little smaller, so it didn’t overwhelm the hat.
and a side view
megs new hats.
i hat a little bit of yarn left over from my lost and wandering socks. i figured there was just enough to make a couple of hats for the girls. turns out i had enough to make 4 with less than 30cm of yarn left over when i was done! they made cute beanies but meg insisted she want BIG pompoms on them. we went through the stash and she chose 4 colors to coordinate with the hats. while watching tv i managed to make and trim down the first three, and she happily modeled the hats for me as i finished. it was actually the perfect activity to do while huge flakes of snow fell steadily outside.
she picked gold to go with the first of the purplier ones
navy with the other
and purple with the first pinker one
i still have one more pom to make. but i ran out of time.
i think she did a great job of picking colors, but i’m not so sure about the size of the pompoms. i think they look a bit big (in spite of my trimming) but she assures me that they are right on trend, and just what she wanted! she’s going to wear one tomorrow when we go out and wrap the others as gifts for nandi, ember and shaelyn… as soon as i get that last pompom done…
vacation pictures.
i’m finally getting around to posting my vacation pictures from the summer. cricket, meg and eilidh went with us to the yukon and alaska for 10 days. we had a wonderful time! the scenery is gorgeous and the weather was nice and cool. we missed the heat wave back home for which we were all thankful. we got back to cooler weather and the next week the yukon got their heat wave, so perfect timing on our part. we did a bit of hiking and a lot of exploring. here are some of my favorite pictures of cricket (wearing her new sweater and hat)
we landed in whitehorse then drove down to skagway
we were driving along through the mountains then suddenly saw sand on the side of the road. when we pulled over there was this amazing stretch of sand dunes which we explored for a couple of hours before driving on.
carcross desert yukon is apparently the world’s smallest desert. but cricket thought it was the perfect size.
exploring the beautiful grounds of the cabins where we stayed in skagway, right near the base of the chilkoot trail. we went on a 2 hour hike up the trail, which was fun. my health isn’t good enough to actually hike the whole thing (apparently a 4-6 day hike!)
we also took the train up the whitehorse pass. part of the historic goldrush trail
cricket was fascinated and stared out the window the whole way.
after a couple of days we took the ferry across to haines. we managed to do a couple of hikes there as well
third try is the charm
i have a 24″ mini tree i bought several years ago and have slowly been changing into a prop for my mnf and smaller girls. it is approx 24 inches tall so on the scale of a 7′ tree. i wish i had thought to take a picture of it “before”. it used to have really ugly outsized berries and huge globs of “snow”. i have removed most of that and replaced them with better scale, mostly homemade ornaments. adding a few more each year. unfortunately while i was working on it, i left it on my south facing kitchen windowsill and noticed that this year instead of having a nice green pine, it has faded to more of a blue spruce :(. not sure if it is possible to recolor it? especially since the ornies are wired on and would be hard to remove. if you have any suggestions on how to fix it, please comment below. otherwise my girls will just have a spruce tree. something that is much more common here anyway, so i guess it works?
the tree had a burlap bag around the bottom and i have wanted a tree skirt to cover it since the beginning. i had elaborate plans but never got around to doing it so today was the day!
my first attempt was to make an origami white felt skirt using a pattern i’d saved ages ago. it looked nice flat but didn’t suit my tree, so into the recycle bin it went.
second attempt was to make a lined skirt. this is the fabric i’m using
i spite of careful measuring, the lining made the skirt too stiff, it stuck out and didn’t hit the floor. so attempt two also went into the recycle bin.
this time i decided to make it just a single layer. i cut the appropriate circle, then slit up the back and trimmed the center till it was just wide enough to wrap round the trunk.
already a vast improvement. but of course i couldn’t stop there…
i went through my lace bin and found some red ruffled elastic. i folded over the outside edge about 1/4″ and pinned the elastic to that edge. then top stitched them together. the back slit and center were just turned and stitched. while looking for buttons to do up the back, i spied a bunch of floral shaped mother of pearl buttons and scattered them around the edge to see what they would look like. i liked it, so tacked them down with glue to keep track of where to put them and then sewed each one on by hand. that looked pretty good but it was still a bit sparse, so i tried adding square mop buttons and some assorted red ones. almost there…. it just needed a few green ones for pop. happy with the number and placement i glued and stitched those as well. several hours later this was the result
i think it is kind of fun and quirky. it’s all made from supplies unearthed in my craft purge, and should be plenty big enough to hide the battery pack from my fairy light string that will go on later this week.
(here is a picture of the tree taken 5 years ago just so you can see the scale)
washtub
in my pre-purge days i had amassed quite a collection of sample cups – you know the ones that costco, or the groceries stores used to pass out samples of food items they want you to try? anyway every time i got a sample, if the food in it wasn’t too sticky, once iI ate the food, i would stick it in my purse or pocket instead of the garbage. at home i would wash it out and add it to my ever growing pile. One time i really scored and the lady passing out samples accidently knocked a stack onto the floor while we were there. she explained that she couldn’t use them for food anymore (obviously) and would just have to throw them out, if we had any use for them, we were welcome to them, of course i snagged them all!
anyway i use the for all sorts of things, like mixing paint colors or holding small amounts of glue when crafting. i reuse them as much as possible and then throw them out when they get too covered with stuff or crack, as they eventually do. as i was looking for something to turn into a washtub, my eyes lit on the stack of sample cups and i knew that some of them would be perfect.
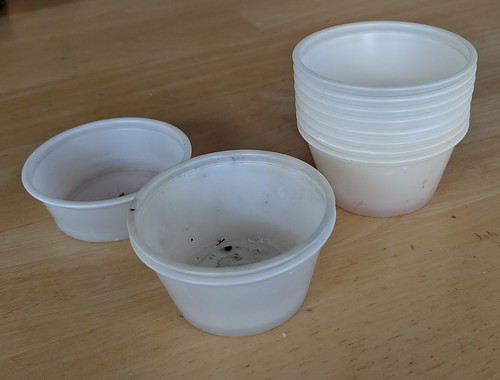
this is just a few of the ones i have at the moment. you can see they are all well used.
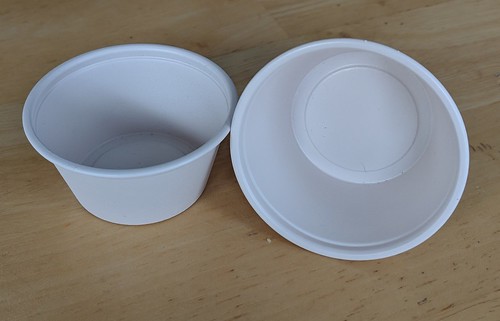
while i was making my washboard i coated the cups with off white primer. i have a good can of spray that will stick pretty much anything – wood, metal, plastic etc. i use that as my base coat so my acrylic paints will stick and not just drip or peel off.
next i sprayed on a coat of stainless silver to get the right base color…. and disaster!
even though they were both the same kind and brand of paint. the paint peeled and buckled when i put on the first coat. so back to the drawing board.
of course this washtub fits the bigger of my two washboards, so i had to find something else for my realpuki’s anyway. as luck would have it, i was putting in an order for new saw blades at stockade wood supplies, and they had a miniature tub available, and it was smaller than any of the ones i had seen. i thought it might be the perfect size so added it to my order.
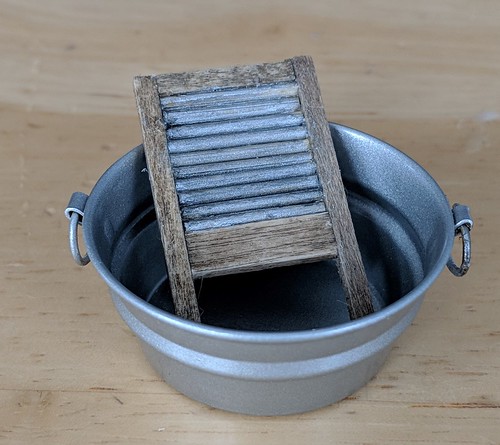
turns out it was perfect. since it was already silver i just needed to make it look worn.
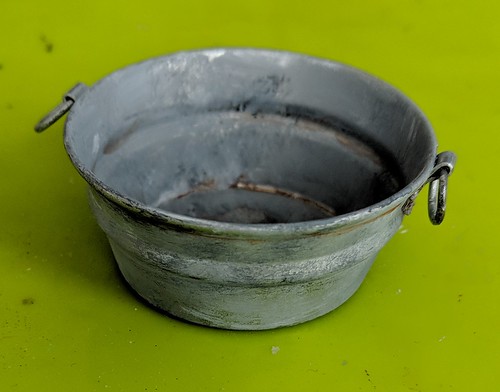
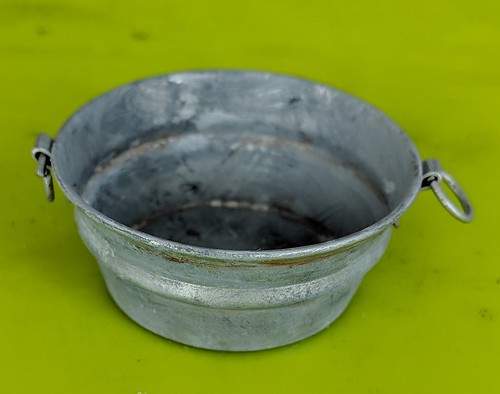
to age it, i brushed on random streaks and dabs of black and white and grays. as usual i put a bit of each color on my palette, and used a toothpick to swirl it together in the middle. this gives me black, white, and a near infinite variety of grays. i looked at several pictures of old galvanized tins and buckets from the internet, as i worked, so i could see what i was aiming for, and make sure it looked realistic.
After that paint dried, for the final touch, i added some rusty brown wood stain in the creases, and around the handles -places where rust was most likely to form. the stain is more transparent than the paint, so works better for light rusting than the thicker acrylic would.
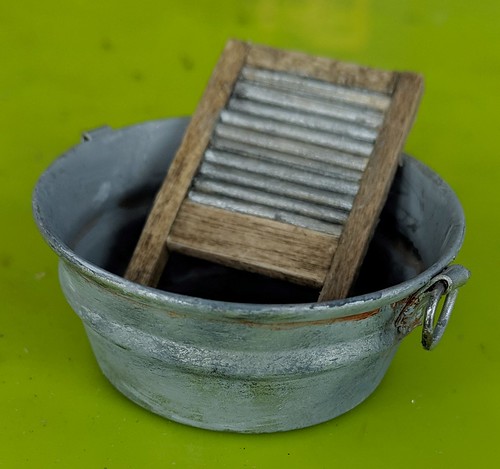
washboard
it’s hard to stay clean while traveling, so my ‘pukis asked for a washtub and board. i made the washboard first.
i started with toothpicks – placed on duck tape to make it easier to cut them all the same size,
skinny sticks
and 5/8″ wide craft sticks.
not shown is silver and black paint, wood stain, and fast tack glue.
here are the sizes i cut to get to approx 1/12th scale. i used a pair of heavy duty scissors to cut on the drawn line for the toothpicks, and my small saw to cut the wood. you could use a small saw for all of it, or a good cutting knife.
first i pre-painted the rollers silver and stained the wood. when that was dry, i glued the top and bottom wood pieces to the top and bottom toothpick. next i lined up toothpicks till i liked the length and glued on the sides. there is no need to glue the toothpicks to each other as the side pieces hold them all in place. make sure the glue covers the whole edge except for the bottom “leg” portion.
once the glue dried, i dry brushed on black paint over the silver to age it.
there you have a quick and easy washboard!
except…. it was too big!
i somehow forgot that 1/12th scale is too big for my ‘puki’s :doh. the washboard was better suited for my realfees or my dream high elf so i’m thinking it’s actually more like 1/8th? anyhow i did the same thing again just cutting it all smaller.
this time i used the skinny sticks for the top and the bottom, and match sticks for the sides. the finished measurements are 1″ wide by 1-3/4″ long. the toothpicks, top and bottom pieces are cut 3/4″ wide. the bottom is a full skinny stick width, the top is a piece split roughly in half.