one of the kals in the yarnathon this year is to make stitch samplers. they can be any size and contain any number of stitches from one to…. the only rule is they all have to be different and they have to be some sort of rectangle. (too bad, i had some great mandalas i wanted to make, but maybe next year) i decided to finally get around to making samples of some of the stitches i would like to try designing with. i often find and intriguing stitch, and then don’t like it when i go to stitch it up in laceweight, because the scale is off for my girls. i am planning to do a bunch of them and put them in frames to decorate my craft room. as usual i have already spent more time planning and making ancillary projects than i have actually making samples. case in point. the frames…
i had a rough idea of the types of frames i liked, and that i thought would work well. i didn’t want a lot of small frames, so collage frames seemed to be the way to go. i looked at a lot of them and for the most part there was always something not quite right. my favorite was a large barnwood style frame with what looked like several clotheslines strung across it from which you could suspend several pictures using small clothepins. it had an open back so your wall color would show through. the only problem with it was that for some weird reason there were only 3 clothespins per “line” so you could only put up 2 pictures (or in my case samples) and they would have to share one of the pegs. i envisioned something more like an actual clothesline with tiny knit crocheted blankets or quilts hanging from it. i figured i could probably adapt a frame to suit, but i wanted a real wood one, not a wood- grain-painted-plastic one like most of the larger ones i could find. so i headed off to the local thrift shop to see what i could find.
generally at the thrift shop you can’t have anything definite in mind, but have to instead look beyond the surface of what there is to discover its’ potential. i had hoped to find a large frame, somewhere in the 11x16ish range. they had them, but they were cheap plastic, just what i didn’t want. at the back of one of the bins i found one that i thought had potential. it was a long narrow frame, with a mat cut so that you would stick in 3 pictures side x side or up and down. it was solid wood, with the miters so tight i could barely see the seam. i wasn’t enamored with the stain color, but i could always sand that off and re-stain it. it would mean doing one long clothesline, instead of several shorter ones, but i thought it would work, and it was only a couple of bucks.
i next went to the dollar store and picked up some narrow cord and tiny clothespins and i was in business
after i got it home i looked up at more frames online to see exactly how i wanted to do this and had the thought that it would look really cool with a random wood backing instead of the wall showing through, so i measured the opening and went off to the hardware store for wood strips. my first thought was to just get a few strips and stain them different colors, but when i got there i found out that by sorting through them and looking at the grain/color i could get enough variety from the natural wood. i ended up getting two polar strips 1-1/2×1/4″x4 feet long and two oak strips the same size. i also picked up a package of flat thumbtacks to tie my clothesline to.
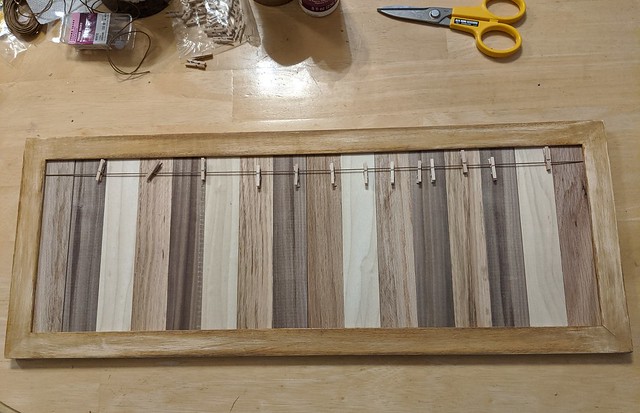
out in the garage i measured the wood strips against the cardboard backing to make sure they would fit inside the frame and cut them to length, placing the pieces inside so that the color striped randomly. i really lucked out here and my pieces filled the frame exactly with no big gaps and no need to split any of the boards lengthwise. next i glued the cardboard back to the strips to hold them all in place and, once the glue dried, lifted it out of the frame . i took the frame and sanded it down, planning to re-stain it, but once i got the shine and some of the color off, i really liked the way it looked, so just left it. i stuck two of the thumbtacks in the back of the frame and tied on my clothesline. the pins are just placed on the line like they would be in real life, rather than strung on the line like most frames i have seen. that will give me maximum versatility, since i can add or remove the pins as necessary. the normal swivel pins that hold the back on had to be removed since they no longer worked and i didn’t want them scratching my wall. to replace them i put several more thumbtacks in the frame, just overlapping the back board enough so that the whole thing will stay together. if it is ever necessary to fix the clothesline i can always pull them out to get the back off.
of course i was so busy making this i never though of taking photos till it was all done :doh
anyway here it is. i had thought of sealing the whole thing with matte varnish, and i still may later, but for now, i like it just the way it is 🙂
and the back

you can see the holes here i removed the original clips. also the thumbtacks to hold the frame on, and the ones set farther back for the clothesline. you can also see what the original frame color looked like