You are currently browsing the bjds category
Displaying 61 - 70 of 309 entries.

monumental

  • Posted on February 22, 2019 at 11:07 pm

i needed to take pictures of a monument in my hometown for the esk yarnathon but i don’t live in a town, and i didn’t want to post where i actually live, so i am starting a series of pictures within driving distance instead.

in all these pictures meg is wearing a hat made from esk yarn last year, a cowl made this year and a jacket made from one of my first orders made back in 2010…

here are the first three…
milk river
milk river ab
commemorates the fact that many dinosaur fossils were found in this area, digs are still going on

vulcan
vulcan ab no explanation needed i trust? this is my dh’s home town!

stage coach robbery
this is a stagecoach marking the site of the only stagecoach robbery in alberta history

meg’s new cowl

  • Posted on February 14, 2019 at 2:38 pm

i made a new cowl for meg and i love how this one came out. it was kind of a pain to knit, linen stitch on 1.5mm needles (i was using the wrong length for most of it too) but in the end it was worth it. i like this one so much i want to order more yarn and size it up for me!
megs linen stitch cowl

i’m not sure she was super impressed with me for not clearing the snow off the stump before i had her sit down though
sitting on a snowy stump

feb 5

  • Posted on February 7, 2019 at 4:42 pm

feb 5
got to use some of my colder temps this row

fishing pole!

  • Posted on December 27, 2018 at 8:36 am

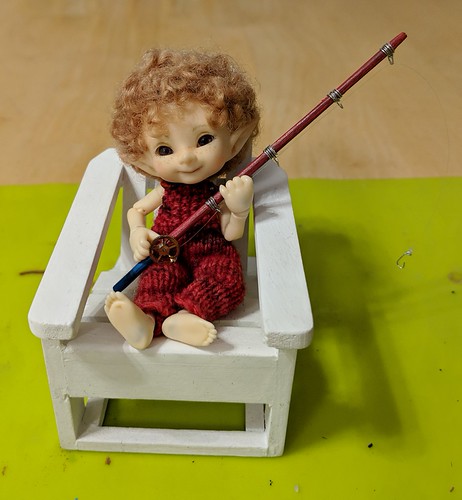
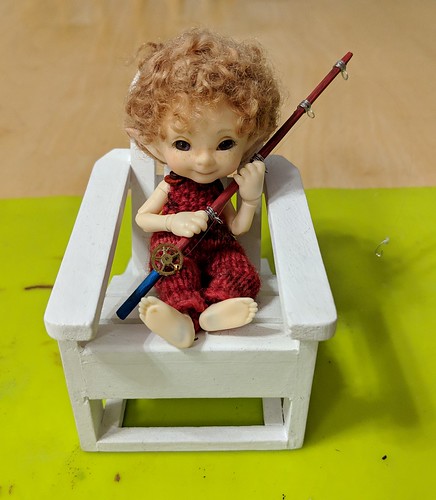
my realpuki gypsies asked for a fishing pole, so they could catch themselves some dinner, so i went looking for supplies.
fishing pole parts
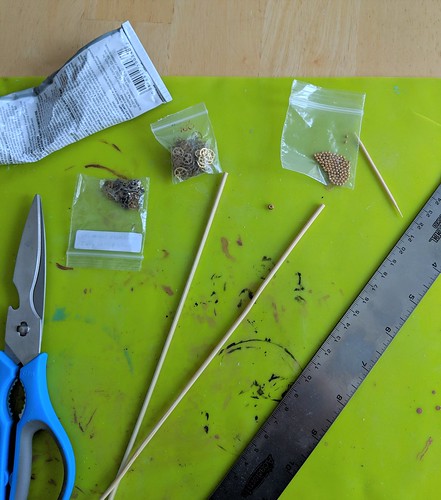
a skewer and some old watch parts, and tiny gold beads seemed like a good start. in addition i got a ruler to check the length, my e6000 glue since i would be gluing metal, a toothpick to apply the glue, and scissors to cut the rod.
the first thing i realized was that my skewers were to thick to be in scale. my ‘pukis wanted a nice light rod, not a heavy stick! toothpicks would have been the right width, but were’t long enough so i went out to the garage to get sandpaper and carefully sanded down the skewer till it was the right diameter. i kept rolling it while i sanded to keep it round.
fishing pole sanded
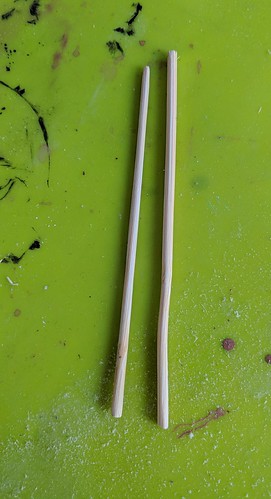
the rod on the right is the original diameter, the rod on the left is how i sanded it down.
next i applied a thin layer of dark brown to the top, and light brown on the bottom for a handle. when it dried it looked to dark/dull, so i over-painted with red on top, blue on the handle. i forgot to photograph this step, but you can see the colors in the later pictures anyway.

fishing pole reel
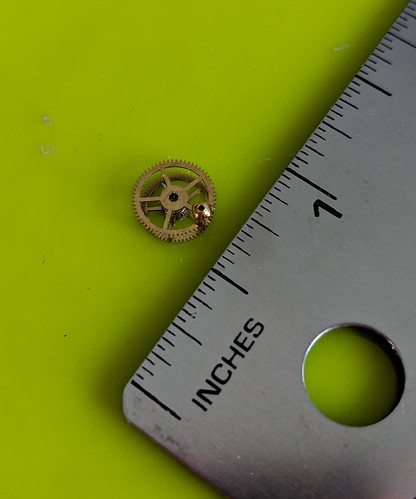
while the paint was drying i made the reel. i picked out two gears for the sides, and a small tube-like gear for the center spacer. i glued those all together and added a tiny bead for the handle.
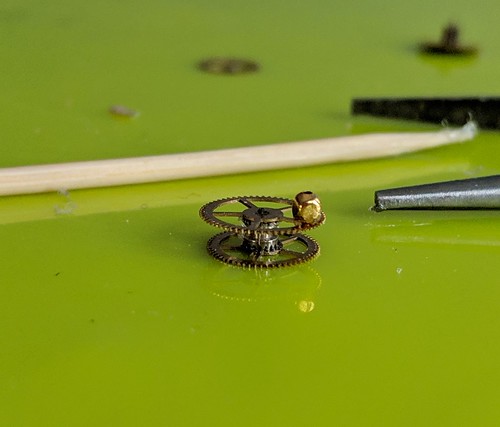
fishing pole reel side
and a side view.

fishing pole loop guides
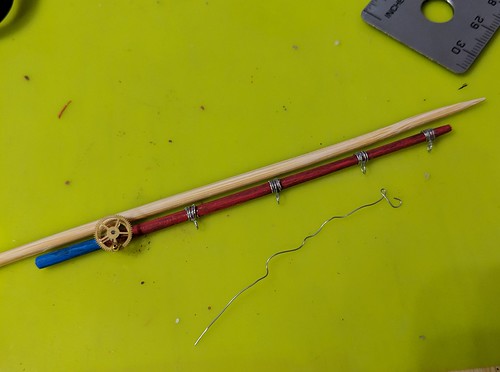
next i went to my craft supplies and got some very fine wire. i would have preferred brass/copper to coordinate with the reel, but all i had was silver tone, and since i am on a craft purge, whenever possible i am using what i have instead of buying new.
i wrapped the wire a couple of times around the rod, twisted it around a toothpick to form a loop, then wrapped it twice more around the rod, and cut off. i did this 4 times to get four loop guides. when i had them all done, i spaced them evenly along the rod, and added a touch of glue to keep them in position. then glued the reel on near the handle and let the glue set. from a small scrap of the wire, i made a fishhook shape.

fishihg pole reel finished
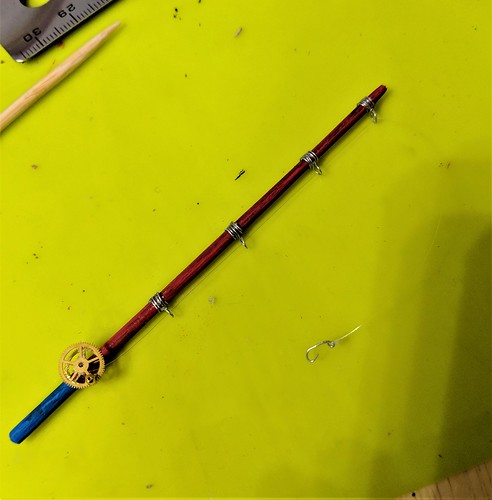
once the glue was set i tied a piece of invisible thread to the hook with a surgeons knot. a dab of glue made sure it wouldn’t come undone. the thread was then threaded through the loops and wrapped several times round the reel. another dab of glue kept it from un-winding. i left the ends intact till the glue set, then trimmed them as close as possible. you have to look really close to see the thread, since it is, more or less….invisible. but the scale looks perfect in real life.
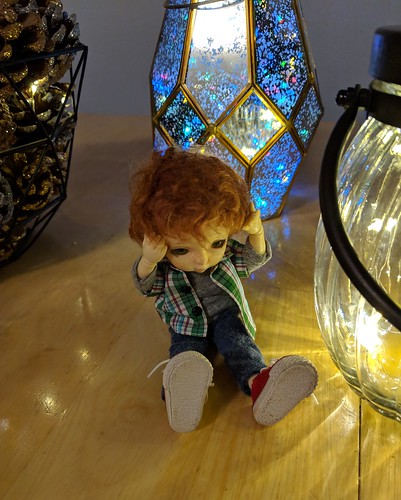
tumnus approves his new rod
tumnus agrees!
tumnus approves his new rod

cricket and the christmas lights

  • Posted on December 26, 2018 at 7:58 am

cricket posed by the tree to wish you all a merry christmas
merry christmas
then she discovered the fairy lights!
fairy lights
wishing you all a christmas filled with magic and wonder

merry christmas from our gang

  • Posted on December 25, 2018 at 9:37 am

merry christmas from our gang

christmas mahem

  • Posted on December 24, 2018 at 9:25 am

meg volunteered to help finish decorating the tree this year. the others were too busy baking cookies, or wrapping presents, but dovey, emrys and noah wanted to help.

decorating the tree
at first all went well as they each hung ornaments on the branches

uh oh
then noah decide his stool was too low and he needed to get higher to help meg reach the upper branches

noah get down
meg looked up to see him balanced precariously on the uppermost branches. reaching up she scolded, “noah get down, before you fall!”
too late
but it was too late, she couldn’t reach him in time and noah tumbled to the floor. holding his head he sighed “ouch!”

meanwhile on the other side of the tree,
meanwhile on the other side of the tree, emrys had climbed up on a stool to hang ornaments above dovey’s head

i think i can reach
some of the branches were just a little too high, but emrys thought he could reach them

meg look!
just then dovey turned around “meg look!” she cried out.

rescued
this time meg made it in time to rescue emrys

you two sit right here
you two sit right here, she sighed, dovey and i will finish the tree

plant stand 3

  • Posted on December 23, 2018 at 1:00 am

i have a mini candlestick for the third one. it’s about 3 inches tall. i planned to do the top as a 1-1/4″ wood disk with a tile mandala, so it would coordinate with the first two.
plant stand 3

plant stand 3
it looked good that way, and i may come back and make another like this, but…

then i found this charm in my stash and decided it would look better with the furniture, and be more unique.
plant stand 3
i glued it on with e6000 glue, it’s my favorite for glueing metal to things.
plant stand 3
top view,
plant stand 3
side view, it’s coming together now.

after the glue set,a much longer wait with this glue than with my trusty white glues, i sprayed the metal with white paint. the paint i have is a paint and primer all in one and the same one i use as a base coat when i paint on plastics. normal acrylics just peel off without the primer. i sprayed it lightly as i wanted some of the dark metal color to show through.
plant stand 3
the wood was painted with more normal acrylic paint. since i was painting it white as well i didn’t have to worry about overspray. if i had wanted to do the bottom a different color i would have had to either do an even coat of the spray on the whole thing as a solid base coat or else paint the top separately before gluing it on.
plant stand 3

plant stand two

  • Posted on December 22, 2018 at 7:31 am

this is a repeat of the plant stand that i made for the little sunroom. the only difference is which mandala i “tiled” it with
i started with a tall tall skinny spool and a wood disk ( both from michaels) the spool is 2-3/4″ (7cm) tall x 1-1/8″ (28mm) wide. the disk is 1-1/2″ (35mm) in diameter
plant stand 2
glued on the top
plant stand 2
painted it white and picked another mandala for the “tiled” top
plant stand 2
plant stand 2
it’s funny how long i took to decide which mandalas to use on these first two. i wanted to be sure they looked good together and with the floor tile, even though chances are most of the mandala’s will be covered with the plant pots when the scene is done. at least i will know that they look good under the pot 😉

plant stand #1

  • Posted on December 21, 2018 at 2:38 pm

a conservatory needs lots of plant stands so that all the plants aren’t just sitting on the floor. i don’t have much time this close to christmas, but these are pretty quick so i figure i can get one done every day or so. once i get them all done, i’ll see how they fit in the greenhouse and decide which ones to use for this project and which will go in the box for future use.

the first one is just a simple wooden spool for the base and a disk for the top.
a greenhouse needs a lot of plant stands.  here is the first
to give you an idea of size, the disk is 1-1/2″ in diameter

just like the plant stand in my mini sitting room, i glued the disk on with wood glue, being careful to center it, and then let the glue dry
a greenhouse needs a lot of plant stands.  here is the first
and the side view
a greenhouse needs a lot of plant stands.  here is the first

once the glue dried i painted it with the translucent white paint. i still can’t get the paint to show up in the photos, so didn’t bother posting a picture of that step.

i picked another mandala “tile” from the pile of remaining mandalas – you can fit a LOT of 1 to 1-1/4″ circles on a single piece of card stock, so i had plenty to choose from! – then modgepodged it on top and brushed with a thin coat to seal. quick as that the first one is done.
a greenhouse needs a lot of plant stands.  here is the first

a greenhouse needs a lot of plant stands.  here is the first