You are currently browsing the bjds category
Displaying 71 - 80 of 309 entries.

starting greenhouse #2

  • Posted on December 19, 2018 at 3:35 pm

it’s time to get to work on the second greenhouse. this one i believe was from homesense. it’s a little bit bigger, so i can do a bit more with it.
greenhouse

once again i picked a tile from my collection, printed it on cardstock and sealed it before cutting.
greenhouse tiled
i’m going for a more outdoorsy look this time. more like a greenhouse, rather than just a sunroom.

for furniture i am using the other two pieces from my garden set.
greenhouse furniture
this will allow two or three ‘puki’s to enjoy the room.

greenhouse tea set
and apparently the puki’s think that is enough work for today, because they got the tea set out already! i don’t see them around so i expect they may have gone to get some cake…

making a simple plant stand

  • Posted on December 18, 2018 at 8:02 am

of course a conservatory wouldn’t be right with out at least a plant or two on plantstands. i didn’t have a lot of room in this one so decided to go fro just one.

i started with a tall tall skinny spool and a wood disk ( both from michaels) the spool is 2-3/4″ (7cm) tall x 1-1/8″ (28mm) wide. the disk is 1-1/2″ (35mm) in diameter
making a simple planter

first i glued the disk to the top of the spool, making sure it was centered.
making a simple planter

after the glue dried, i painted with translucent white paint (it doesn’t photograph that way but in real life this is whitish not just plain wood) you could get the same effect by thinning white acrylic paint with water, but i happened to have some that was pre-thinned so used that. next i did up a page of mandalas sized to fit. since i didn’t want to waste paper by only printing one circle and plan to make more planters for my second greenhouse later, i filled the page with a whole bunch of different ones. this time i printed it on plain printer paper, rather than card stock, because i wanted it to sit flush. i cut out and auditioned the various mandalas to see which i liked best. they always print in different tones than i get on my monitor, so i’m never sure which one(s) i will actually like till i try them. i chose this one because the tones work well with my floor tile. once i decided, the other circles got put away for later use and i used modge-podge to both attach and seal this one on top.
making a simple planter
the problem with zooming in, is that you see a lot of the imperfections that just aren’t noticeable when you look at them. case in point the pixelation on the tile is very hard to see in real life, and just makes for a soft, slightly worn look, perfect for the soft white stain on the wood.

a crocheted plant i made several years ago sits atop the new plant stand and the room is done. it’s too tiny to hold anything more.
finished room

while i was getting my camera, tuppence grabbed a couple of books, made herself a cup of hot tea, and claimed the room as her own.
tuppence settles in
her only complaint was that this close to christmas she thought the plant really ought to be a poinsettia or a christmas rose. i promised to look for one or make one for next year.

in spite of that i think she looks rather pleased with herself don’t you?

conservatory furniture

  • Posted on December 17, 2018 at 7:24 am

furniture was easy, just took some time it involved rooting around in some boxes upstairs and auditioning garden furniture i had collected over the years to see what fit. in the end i decided to use this rocker and small table. the matching lounge and coffee table should fit in my second sun room.
furniture

a tiny sun room

  • Posted on December 16, 2018 at 5:19 pm

in the closet of my craft room were a couple of glass lanterns/terrariums that i thought would make nice sun rooms for my ‘pukis.

this is one i picked up at michaels a year or so ago, and then like many other things, stuffed it in my craft room and never did anything else with it. i’m starting with this one because it is smaller and should be a quick project.
mini greenhouse

i wanted a tiled floor, and didn’t want to spend a lot of time on it, since most of it will be covered with furniture,anyway, so i trimmed and added paper, test the fit, trimmed and added more till i got a perfectly fitting pattern for the inside floor. i marked the front. then printed off tile from my saved file on the computer. the pattern was traced on the back, carefully cut out, then just a quick couple of coats of sealer later, i had this
mini greenhouse tile

voila, a tiled floor
mg floor tiled

attaching the door

  • Posted on December 11, 2018 at 8:10 am

this probably doesn’t deserve a separate post, since the door is just glued together then glued on the caravan, but my time has been a bit tight lately and it took two days to get it done!

after the paint dried, i glued the details to the door first. it turned out the window frame was slightly too small to match up so i didn’t use it, but there is enough detail on the door that it didn’t matter.
door glued

then glued the door to the caravan.
door attached

i was being lazy and didn’t want to take all the bedding and stuff out of the caravan again so that i could turn it on it’s side, so i ended up having to sit there and hold it in place while the glue set, only a couple of minutes so not too bad. luckily i also like to read, so it wasn’t a problem just sitting there.
the size is perfect. i kind of wish now that i had made the top wood paneling covering extend to the edges,i think it would have looked better, but it’s too late now and it is what it is.

a door for the caravan

  • Posted on December 10, 2018 at 9:05 am

i ordered an 85 mm door for my realpuki caravan a while back, but due to the mail strike here, it just arrived. it was worth the wait though, the detail is fabulous.
they’ll have to stoop a bit to get in, but the size was the right fit for the caravan. and since i am putting it on the back wall, it won’t actually open anyway 🙂
here’s how it came. the details were actually in a square but i took the outside edges off right away. it was nicely packaged and arrived safely in spite of the intricacy
fairy door

here i have separated out the parts i plan to use. the notice for the door is cute, but doesn’t really fit my caravan, so for now at least i’m leaving it to the side.
fairy door parts

and here are the pieces painted and waiting to dry.
fairy door painted
i painted the door itself with a light coat of translucent blue. i brushed it on lightly trying to leave unpainted any part that might have worn off. the ironwork was first painted solid black, then dry-brushed with brown stain to mimic rust. my puki’s really ought to take better care of their caravan! 😉

ageing the wheels

  • Posted on December 9, 2018 at 2:47 pm

finally got a chance to try and fix the wheels on the caravan. several people had suggested just trying to make them look dirtier/more worn to fit the rest of the caravan, so i thought i would try that first. i put the caravan up on a couple of paint jars, so i could access all the edges at once, and then with dark brown stain did a combination of dry brushing, smudging and painting on a very watered down version till i like the effect. i think the wheels fit in better now. what do you think?

front
ageing the wheels

back
ageing the wheels

from a “distance”
ageing the wheels

christmas lights… wow!

  • Posted on December 4, 2018 at 7:43 pm

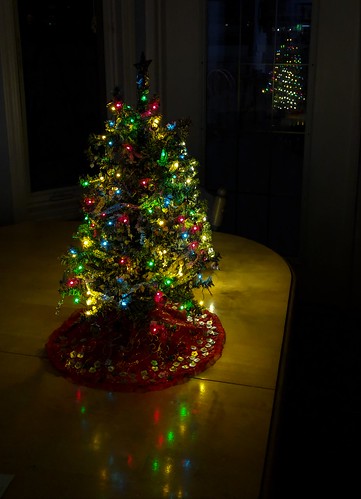
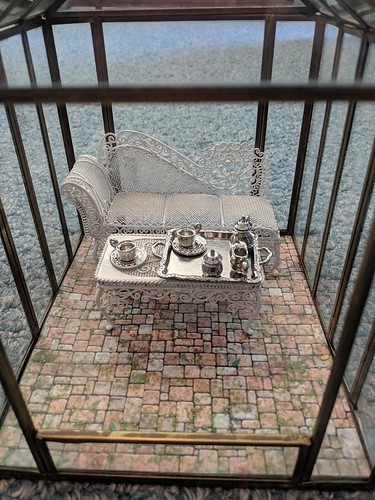
that is my son’s comment every time he sees lights. since it is december i promised him we would set up the tree, but life intruded and we just haven’t done it yet. as a compromise i decided to add lights to the mini tree and put them out on the table. he seems happy for now.

i had dental surgery today and apparently did some rather odd things while under the sedation, but i’d recovered enough by tonight that meg said she would help me untangle the lights. i was grateful for her help because they were rather a mess. the little tree wasn’t too bad. it was 16 feet long, and while it uncoiled like a spring when we took it off the cardboard, it was at least in more or less a straight line. we wrapped it round the tree, looping around the branches and the length was pretty much perfect!
small tree with lights
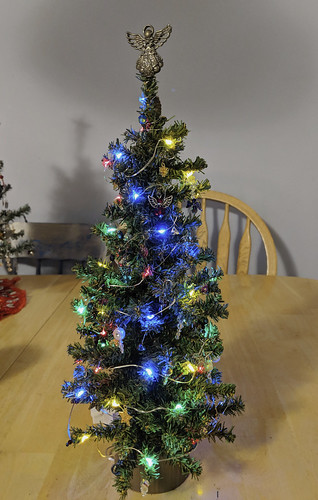
the lights can be either white or multicolored and have an option of several different patterns solid, blinking, fade in and out etc. the lights on colored mode are a little pale, but i like the concept.

the larger sting was more of a challenge. it was 33 feet long, which i figure would be about right. but they had wrapped it double around the cone so first we had to untwist the whole length which was springy and kept trying to re-twist. then get it wrapped evenly around the tree without tangling again! the whole thing reminds me why our full-sized trees are pre-lit. these one are going to get stored pre-decorated as well.

finally after much work, and several cup of cocoa on megs part, and ice-cream fudge bars on mine (dental surgery, remember, no hot liquids 🙁 ) we were done and the results were definitely worth it. the string would have been perfect if it just had 3 more lights, but i doubt anyone will notice, other than meg and me.
meg with tree
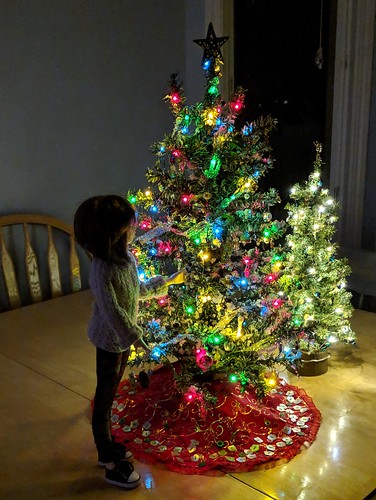
this tree has lots of different patterns in the lights as well, but they are always colored, since the covers give the color not the leds. as a result they are much brighter.

when i am feeling better, we plan to set the tree up in front of the fire place and try and corral the littles for some christmas pics (if we can get them out from behind the tree where the controls are!)

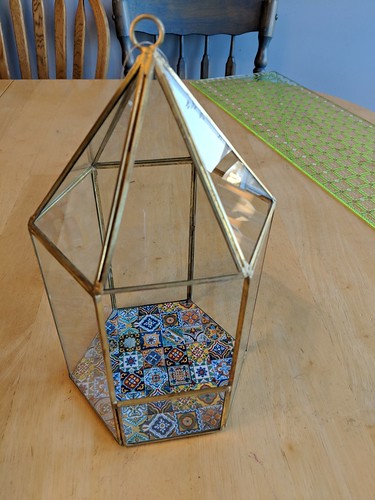
in the mean time, we’ll leave you with one last picture of our lovely lit trees
reflections

and so it begins again

  • Posted on November 27, 2018 at 12:11 pm

i finished up the ornaments on my mini tree (see post earlier this month) and in keeping with my resolution to purge i bundled up most of the extra beads and dropped them off at the charity store, yesterday. i was planning to just drop and run, but they had a big sign up front that all their christmas stuff was now out… so i just had to go take a look. on one of the tables was an 15″ tree, one of the ones with perfect scale tiny branches and it was marked at only $2. of course i immediately decided my girls needed a second tree. the 24″ one is a bit big for some of the smaller kids.

once i got home and confirmed that this indeed was a perfect tree, i panicked. i realized that i had just given away all the extra ornaments :doh you see why i so seldom purge?
because who doesn't need two christmas trees?
i found some lovely angel charms on sale for cyber monday and quickly ordered a few. but luckily before i went too crazy reordering ornaments i took a look through the beads and charms that i had decided to keep and found i had a lot more than i thought. enough to pretty much fill the tree, which is what i did this morning.
minit tree ornaments
i have a few spots left for the angel charms when they come, the angel on top desparately needs repainting, and of course i will need to add lights (which i have in my box) and make another tree skirt. but overall i’m happy and my desire to purge is back on track 🙂

and another one done

  • Posted on November 25, 2018 at 7:08 am

got up this morning and finished the pom pom for the last hat. since this one was so bright, meg let me go just a little smaller, so it didn’t overwhelm the hat.
last of the hats done
and a side view
last of the hats done